azure powershell

Azure – Audit report (Azure automation runbook)

The PowerShell script is an Azure automation runbook that pulls the below data and populates the data into a CSV file. The script then summarizes the data into an email’s body and sends an email to the recipient with the CSV files as attachments.

If the Azure automation runbook is scheduled to run every day, you will get a summary/high-level view of what is happening in your environment to your email box. The email could be the first report any organization’s high management would desire to look at.

1. Count of De-allocated Azure virtual machines

2. Count of Running Azure virtual machines

3. Count of Stopped Azure virtual machines

4. Count of Azure virtual machines that do not have native backup configured (Azure Back up and Recovery service)

5. Count of Inbound Security rules that causes vulnerability

Download the script

Sample Summary:

Screenshot from 2018-06-04 19-13-52

Email is sent via SendGrid service. You need to update the script with your SendGrid credentials.

You may choose a “Free Tier” pricing for SendGrid. Below is documentation to create a SendGrid account:

https://docs.microsoft.com/en-us/azure/sendgrid-dotnet-how-to-send-email

Note: The script is an Azure Automation runbook. You have to run it from an Azure Automation account.

If you would like me to add more data that would be useful as an Azure audit report, please let me know.

Click here to download my PowerShell scripts for Free !!

Click here for Azure tutorial videos !!

Advertisement

Azure – Install exe files (BigFix) on Azure windows virtual machine using Azure Custom Script Extension (CSE)

What is custom script extension?

The Custom Script Extension downloads and executes scripts on Azure virtual machines. This extension is useful for post-deployment configuration, software installation, or any other configuration/management task. Scripts can be downloaded from Azure storage or GitHub, or provided to the Azure portal at extension runtime. The Custom Script extension integrates with Azure Resource Manager templates, and can also be run using the Azure CLI, PowerShell, Azure portal, or the Azure Virtual Machine REST API.

This document details on how to use Custom Script Extension using the Azure PowerShell Module against an already provisioned Azure Windows virtual machine to install BigFix client.

Pre-requisites:

Operating System

The Custom Script Extension for Windows can be run on Windows 10 Client, Windows Server 2008 R2, 2012, 2012 R2, and 2016 releases.

Script Location

The script needs to be stored in Azure Blob storage, or any other location accessible through a valid URL.

Internet Connectivity

The Custom Script Extension for Windows requires that the target virtual machine is connected to the internet.

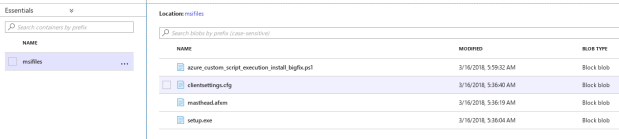
The BigFix client files are stored in the storage account:

1

We shall be naming the extension as “bigfixinstallextension.” Make sure that an extension with the same name already does not exist.

Step 1: Get the Azure virtual machine config object

$vm = get-azurermvm -ResourceGroupName “datadog-test” -Name “dg-private-1”

Step 2: Query the Virtual Machine object for existing extensions:

$vm.Extensions

You should see an output similar to below if it does not have any custom extensions.

2

Note: any azure virtual machine will have one default extension – “MicrosoftMonitoringAgent.” This is because Azure installs “Microsoft Monitoring Agent” on every virtual machine. Make sure, the virtual machine does not have another extension with the name “ bigfixinstallextension.” If it does have, we have to remove that extension.

Below link provides an Azure Powershell cmdlet to remove the extension:

https://docs.microsoft.com/en-us/powershell/module/azurerm.compute/remove-azurermvmextension?view=azurermps-5.5.0

Once, we have confirmed that a custom extension with name “ bigfixinstallextension” does not exists, we can proceed in adding one. Below is the powershell code:

# Resource group of virtual machine

$resource_group = “datadog-test”

# location of virtual machine

$location = “East US 2”

# azure virtual machine name

$vm_name = “dg-private-1”

# storage account name where the custom script is stored

$storage_account_name = “xxxx”

# storage account key of where the custom script is stored

$storage_account_key = “xxxxxxxxxxxxxxxxxxxxxxxxxxxxxxxxxxxxxx”

# custom script file name

$file_name = “azure_custom_script_execution_install_bigfix.ps1”

# container name where the custom script is stored

$container_name = “msifiles”

# extension name for the custom script extension

$extension_name = “bigfixinstallextension”

# azure powershell cmdlet to execute add the custom script extension and to execute the powershell file

Set-AzureRmVMCustomScriptExtension -ResourceGroupName $resource_group -Location $location -VMName $vm_name -Name $extension_name -TypeHandlerVersion “1.1” -StorageAccountName $storage_account_name -StorageAccountKey $storage_account_key -FileName $file_name -ContainerName $container_name

Output:

4

Now login to the Azure windows virtual machine to confirm if the BigFix client is installed and running:

5

The downloaded file can be found inside the virtual machine at the below file path:

C:\Packages\Plugins\Microsoft.Compute.CustomScriptExtension\1.9\Downloads\1

Extension execution output is logged to files found under the following directory on the target virtual machine. For troubleshooting.

C:\WindowsAzure\Logs\Plugins\Microsoft.Compute.CustomScriptExtension

Explaining the PowerShell scriptazure_custom_script_execution_install_bigfix.ps1

This script gets executed as part of the Custom Script Execution. And it is responsible for installing the BigFix agent.

Below is the code:

# Create a directory to hold BigFix files

new-item ‘c:\bigfix’ -ItemType directory

# Copy BigFix files from Azure storage to local directory

Invoke-WebRequest -Uri https://customsc.blob.core.windows.net/msifiles/clientsettings.cfg -outfile ‘c:\bigfix\clientsettings.cfg’

Invoke-WebRequest -Uri https://customsc.blob.core.windows.net/msifiles/masthead.afxm -outfile ‘c:\bigfix\masthead.afxm’

Invoke-WebRequest -Uri https://customsc.blob.core.windows.net/msifiles/setup.exe -outfile ‘c:\bigfix\setup.exe’

# Execute the setup file

$arguments = “/S /v/qn”

$filepath = “c:\bigfix\setup.exe”

Start-Process $filepath $arguments -wait

Execution Flow:

1. Create a directory to hold big fix files.

2. Copy the three files associated with BigFix installation to the directory created in Step 1.

3. Execute the setup file in silent mode.

Click here to download my PowerShell scripts for Free !!

Click here for Azure tutorial videos !!

Azure – Collecting performance metrics for Azure virtual machines

Azure Monitor provides several ways to interact with metrics, including charting them in the portal, accessing them through the REST API, or querying them using PowerShell or CLI.

In this blog, we shall learn how to fetch the metrics for our Azure Virtual Machines using PowerShell. The script that I provide can be used as a utility to generate quick reports.

Below is the script:

<#
AUTHOR:
Manjunath Rao
DATE:
February 21, 2018
DESCRIPTION:
The script will generate performance metrics (as recorded by Azure agent) from Azure virtual machines and then populate into an excel sheet.
REFERENCE:
https://docs.microsoft.com/en-us/azure/monitoring-and-diagnostics/monitoring-supported-metrics
#>
$ErrorActionPreference = “SilentlyContinue”
# Login to Azure Account
try
{
Login-AzureRmAccount -ErrorAction Stop
}
catch
{
# The exception lands in [Microsoft.Azure.Commands.Common.Authentication.AadAuthenticationCanceledException]
Write-Host “User Cancelled The Authentication” -ForegroundColor Yellow
exit
}
# Prompting the user to select the subscription
Get-AzureRmSubscription | Out-GridView -OutputMode Single -Title “Please select a subscription” | ForEach-Object {$selectedSubscriptionID = $PSItem.SubscriptionId}
Write-Host “You have selected the subscription: $selectedSubscriptionID. Proceeding with fetching the inventory. `n” -ForegroundColor green
# Setting the selected subscription
Select-AzureRmSubscription -SubscriptionId $selectedSubscriptionID
# Get the list of resource groups
$resourcegroup_list = (get-azurermresourcegroup).resourcegroupname
try{
# Create an Excel COM Object
$excel = New-Object -ComObject excel.application
}catch{
Write-Host “Something went wrong in creating excel. Make sure you have MSOffice installed to access MSExcel. Please try running the script again. `n” -ForegroundColor Yellow
}
# Create a Workbook
$workbook = $excel.Workbooks.Add()
# Creating a directory overrides if any directory exists with the same name
Write-Host “Creating a directory: C:\AzurePerformanceMetrics. This operation will override if you have a directory with the same name. `n” -ForegroundColor Yellow
New-Item C:\AzurePerformanceMetrics -Type Directory -Force
Write-Host “Creating the Performance Metrics worksheet…” -ForegroundColor Green
# Adding worksheet
$workbook.Worksheets.Add()
# Creating the “Virtual Machine” worksheet and naming it
$VirtualMachineWorksheet = $workbook.Worksheets.Item(1)
$VirtualMachineWorksheet.Name = ‘Virtual Machine perf metrics’
# Headers for the worksheet
$VirtualMachineWorksheet.Cells.Item(1,1) = ‘Resource Group Name’
$VirtualMachineWorksheet.Cells.Item(1,2) = ‘VM Name’
$VirtualMachineWorksheet.Cells.Item(1,3) = ‘Location’
$VirtualMachineWorksheet.Cells.Item(1,4) = ‘Percentage CPU’
$VirtualMachineWorksheet.Cells.Item(1,5) = ‘Units’
$VirtualMachineWorksheet.Cells.Item(1,6) = ‘Network IN’
$VirtualMachineWorksheet.Cells.Item(1,7) = ‘Units’
$VirtualMachineWorksheet.Cells.Item(1,8) = ‘Network Out’
$VirtualMachineWorksheet.Cells.Item(1,9) = ‘Units’
$VirtualMachineWorksheet.Cells.Item(1,10) = ‘Disk Read Bytes’
$VirtualMachineWorksheet.Cells.Item(1,11) = ‘Units’
$VirtualMachineWorksheet.Cells.Item(1,12) = ‘Disk Write Bytes’
$VirtualMachineWorksheet.Cells.Item(1,13) = ‘Units’
$VirtualMachineWorksheet.Cells.Item(1,14) = ‘Disk Read Operations/Sec’
$VirtualMachineWorksheet.Cells.Item(1,15) = ‘Units’
$VirtualMachineWorksheet.Cells.Item(1,16) = ‘Disk Write Operations/Sec’
$VirtualMachineWorksheet.Cells.Item(1,17) = ‘Units’
# Cell Counter
$row_counter = 3
$column_counter = 1
foreach($resourcegroup_list_iterator in $resourcegroup_list){
#write-output “RG: ” $resourcegroup_list_iterator
$vm_list = get-azurermvm -ResourceGroupName $resourcegroup_list_iterator
foreach($vm_list_iterator in $vm_list){
write-host “Fetching performance metrics for the virtual machine: ” $vm_list_iterator.Name -ForegroundColor cyan
$percentage_cpu_data = get-azurermmetric -ResourceId $vm_list_iterator.id -TimeGrain 00:01:00 -MetricName “Percentage CPU” # Percentage
$network_in_data = get-azurermmetric -ResourceId $vm_list_iterator.id -TimeGrain 00:01:00 -MetricName “Network IN” # Bytes
$network_out_data = get-azurermmetric -ResourceId $vm_list_iterator.id -TimeGrain 00:01:00 -MetricName “Network Out” # Bytes
$disk_read_bytes_data = get-azurermmetric -ResourceId $vm_list_iterator.id -TimeGrain 00:01:00 -MetricName “Disk Read Bytes” # Bytes Per Second
$disk_write_bytes_data = get-azurermmetric -ResourceId $vm_list_iterator.id -TimeGrain 00:01:00 -MetricName “Disk Write Bytes” # Bytes Per Second
$disk_read_operations_data = get-azurermmetric -ResourceId $vm_list_iterator.id -TimeGrain 00:01:00 -MetricName “Disk Read Operations/Sec” # Count Per Second
$disk_write_operations_data = get-azurermmetric -ResourceId $vm_list_iterator.id -TimeGrain 00:01:00 -MetricName “Disk Write Operations/Sec” # Count Per Second
$VirtualMachineWorksheet.Cells.Item($row_counter,$column_counter++) = $vm_list_iterator.ResourceGroupName.ToString()
$VirtualMachineWorksheet.Cells.Item($row_counter,$column_counter++) = $vm_list_iterator.Name.ToString()
$VirtualMachineWorksheet.Cells.Item($row_counter,$column_counter++) = $vm_list_iterator.Location.ToString()
$VirtualMachineWorksheet.Cells.Item($row_counter,$column_counter++) = $percentage_cpu_data.Data[-2].Average
$VirtualMachineWorksheet.Cells.Item($row_counter,$column_counter++) = “Percentage”
$VirtualMachineWorksheet.Cells.Item($row_counter,$column_counter++) = $network_in_data.Data[-2].Total
$VirtualMachineWorksheet.Cells.Item($row_counter,$column_counter++) = “Bytes”
$VirtualMachineWorksheet.Cells.Item($row_counter,$column_counter++) = $network_out_data.Data[-2].Total
$VirtualMachineWorksheet.Cells.Item($row_counter,$column_counter++) = “Bytes”
$VirtualMachineWorksheet.Cells.Item($row_counter,$column_counter++) = $disk_read_bytes_data.Data[-2].Average
$VirtualMachineWorksheet.Cells.Item($row_counter,$column_counter++) = “Bytes Per Second”
$VirtualMachineWorksheet.Cells.Item($row_counter,$column_counter++) = $disk_write_bytes_data.Data[-2].Average
$VirtualMachineWorksheet.Cells.Item($row_counter,$column_counter++) = “Bytes Per Second”
$VirtualMachineWorksheet.Cells.Item($row_counter,$column_counter++) = $disk_read_operations_data.Data[-2].Average
$VirtualMachineWorksheet.Cells.Item($row_counter,$column_counter++) = “Count Per Second”
$VirtualMachineWorksheet.Cells.Item($row_counter,$column_counter++) = $disk_write_operations_data.Data[-2].Average
$VirtualMachineWorksheet.Cells.Item($row_counter,$column_counter++) = “Count Per Second”
$row_counter = $row_counter + 1
$column_counter = 1
}
Write-Output ” ”
}
# Checking if the Inventory.xlsx already exists
if(Test-Path C:\AzurePerformanceMetrics\Performance_metrics.xlsx){
Write-Host “C:\AzurePerformanceMetrics\Performance_metrics.xlsx already exitst. Deleting the current file and creating a new one. `n” -ForegroundColor Yellow
Remove-Item C:\AzurePerformanceMetrics\Performance_metrics.xlsx
# Saving the workbook/excel file
$workbook.SaveAs(“C:\AzurePerformanceMetrics\Performance_metrics.xlsx”)
}else {
# Saving the workbook/excel file
$workbook.SaveAs(“C:\AzurePerformanceMetrics\Performance_metrics.xlsx”)
}
$excel.Quit()

Click here to download my PowerShell scripts for Free !!

Azure – Server Inventory solution

This blog post is dedicated to IT Operations team and administrators who are managing Cloud Infrastructure. The recommended practice while providing managed service to any client is to have a CMDB (Configuration Management Database), which tracks the list of servers and the corresponding details, that we are managing for the client.

However, considering the dynamic nature of the cloud environment, it is a difficult task to maintain such a database. Manually updating the list of servers/server inventory is tedious and error-prone. The only solution is to have an automated approach to this problem.

Below is my solution:

The PowerShell script will extract virtual machines and their details. In this particular case, the script will consider virtual machines, which has tags (‘owner’,’Manju’). That is, I want to manage virtual machines owned only by me. You can go ahead and make changes to the script if you have a different requirement.

Next, the script will write the data into an Azure table. Remember, that the Azure table has to be created before running the script. Another option is Azure Cosmos DB.

Next, you can upload this script to your Azure Automation account or a dedicated windows server. Then, schedule this script to run every one hour to track your server inventory.

The script uses cmdlets from the “AzureRmStorageTable” PowerShell module.

Execute “Install-Module AzureRmStorageTable” to install the module.

Note: You have to alter the script when you schedule the script. The login mechanism is different for “Azure Automation” and “Task scheduler via Windows server”. The login mechanism of the below script is to execute it directly (manually) from PowerShell console or PowerShell ISE.


Script:

# Author: Manjunath Rao
# Date: Febuary 13, 2018

# Install-Module AzureRmStorageTable –>> THIS MODULE NEEDED

# Login to Azure
Login-AzureRmAccount
## Code to create Azure table storage context
$azure_table_storage_account_name = “xxx”
$azure_table_name = “xxx”
$azure_table_partitionKey = “xxx”
$azure_table_rowkey = “xxx”

$azure_table_resource_group = “xxx”

$storage_account_context = (Get-AzureRmStorageAccount -ResourceGroupName $azure_table_resource_group -Name $azure_table_storage_account_name).Context

$azure_table_object = Get-AzureStorageTable -Name $azure_table_name -Context $storage_account_context

############################################

# Getting all the resource group
$resource_group_list = Get-AzureRmResourceGroup

# Iterating through the resource group
foreach($resource_group_list_iterator in $resource_group_list){

# Since the solution applies for virtual machines,
# obtain the list of virtual machines for the resource group
$virtual_machine_list = get-azurermvm -ResourceGroupName $resource_group_list_iterator.ResourceGroupName

# Proceed only when resource group contains virtual machines
if(!($virtual_machine_list -eq $null)){

# Iterate through the virtual machine list
foreach($virtual_machine_list_iterator in $virtual_machine_list){

# Creat an unique ID by concatinating ‘Resource Group name’ and ‘Virtual Machine name’
$unique_id = $resource_group_list_iterator.ResourceGroupName + $virtual_machine_list_iterator.name
#Write-Host $unique_id
$tag_list = $virtual_machine_list_iterator.Tags

$tag_list.GetEnumerator() | foreach {
#write-host $_.key
#Write-Host $_.value
#write-host “”

$partitionKey1 = $unique_id

if($_.key -eq ‘owner’ -and $_.value -eq ‘manju’) {
#write-host “true”
$virtual_machine_name = $virtual_machine_list_iterator.Name.ToString()
$virtual_machine_resource_group_name = $resource_group_list_iterator.ResourceGroupName.ToString()
$virtual_machine_location = $virtual_machine_list_iterator.Location.ToString()
$virtual_machine_size = $virtual_machine_list_iterator.HardwareProfile.VmSize.ToString()
$virtual_machine_operating_system = $virtual_machine_list_iterator.StorageProfile.ImageReference.Offer.ToString()


$hash = @{}
#$hash.add(‘currentDate’, $current_date)
$hash.Add(‘VMName’,$virtual_machine_resource_group_name)
$hash.Add(‘ResourceGroup’,$virtual_machine_resource_group_name)
$hash.add(‘Location’,$virtual_machine_location)
$hash.add(‘VMSize’,$virtual_machine_size)
$hash.add(‘OperatingSystem’,$virtual_machine_operating_system)

# Write data into azure table
Add-StorageTableRow -table $azure_table_object -partitionKey (“CA1”) -rowKey ([guid]::NewGuid().tostring()) -property $hash

}
}

}

}

}


On the other hand, if you would like to fetch inventory details, and just save it in an excel sheet, I have the perfect scripts that do the job for you:

https://manjunathrao.com/2017/12/04/powershell-generte-azure-paas-inventory/

https://manjunathrao.com/2016/12/30/powershell-generate-azure-inventory/

https://manjunathrao.com/2017/04/06/powershell-generate-aws-inventory/


Click here to download my PowerShell scripts for Free !!


PowerShell – List Azure Backup Items

Azure Backup is the Azure-based service you can use to back up (or protect) and restore your data in the Microsoft cloud. Azure Backup replaces your existing on-premises or off-site backup solution with a cloud-based solution that is reliable, secure, and cost-competitive.

Azure Backup offers multiple components that you download and deploy on the appropriate computer, server, or in the cloud. The component, or agent that you deploy depends on what you want to protect.

All Azure Backup components (no matter whether you’re protecting data on-premises or in the cloud) can be used to back up data to a Recovery Services vault in Azure.

You might come across a need to automate the process of generating a report every day and share it with stakeholders to keep track of your backup details.

The PowerShell script will list the “Backup Items” from your Azure subscription. And saves the data into an excel file under the folder  “C:\Backup_job_report.” The excel file will contain multiple worksheets for each “Vault” that exists. The script expects you to provide a text file containing the list of Azure Servers, for which you want to fetch the “Backup Items.”

The details include:

1. VM Resource Name

2. VM Name

3. Recovery Vault Name

4. Last Backup Status

5. Latest Recovery Point

The script is uploaded to Microsoft Technet Script Center’s repository:

List Azure Backup Items using Powershell

You can obtain this information from the Azure portal. Please traverse as shown below:

Sign in to Azure Portal >> Search and select “Recovery Services vaults” >> Select a vault >> Click on “Backup Items” under protected items >> Click on “Azure Virtual Machines”.


Azure


Click here to download my PowerShell scripts for Free !!


Azure – Configure Storage Spaces for Azure VM for increased disk performance

This blog will walk you through on how to configure Storage Spaces for Azure Virtual Machine (Windows). Finally, we get to see some IOPS benchmarks.

Each data disk (Standard Storage Account) has about 500 IOPS. In this example, we are going to create a Storage Space by attaching 4 data disks to a Standard A2 sized Azure VM. In theory, this should increase the IOPS to 2k. (500 x 4 = 2000)


Configuring Storage Spaces for Azure windows VM

Step 1: Attach four data disks to your virtual machine.

From the azure portal, select your virtual machine >> Click on “Disks” >> click on the “+ Add data disk” >> Fill out the details accordingly >> Save the disk.

1

Repeat this process 3 more times and we will have 4 data disks attached to our virtual machine as shown below:

4_disk_attached_azure_portal.PNG


Inside the VM, we can see the disks attached:

4_disk_not_initialized


Step 2: Login to the virtual machine and run the following PowerShell cmdlets. This will configure Storage Space and will create a drive for you.


In our example, we will configure one volume. Hence, only one storage pool. If you are implementing SQL Server or any other architecture, you may need more than one storage pool.

Create a new virtual disk using all the space available from the storage pool using a Simple configuration. The interleave is set to 256KB. We are also setting the number of columns to be equal to the number of disks in the pool

Format the disk with NTFS filesystem and a 64KB allocation unit size.

Below is a snippet of the PowerShell console after executing the above cmdlets.

create_storage_space.PNG

Finally, we can see the drive. A drive named “E” will be created with a free space of ~4TB.

e_drive_created.png


Benchmark Tests

Obviously, this works. However, I have run IOPS test to have a visual. You may choose any standard benchmark testing tools. To keep it simple, I have used a PowerShell script authored by Mikael Nystrom, Microsoft MVP. This script is a wrapper to the SQLIO.exe. You may download the PowerShell script and SQLIO.exe file, HERE.


Download the archive file to your local system and copy it to the server. Extract the contents to any folder.


Below is a sample script to estimate IOPS:

.\DiskPerformance.ps1 -TestFileName test.dat –TestFileSizeInGB 1 -TestFilepath F:\temp -TestMode Get-SmallIO -FastMode True -RemoveTestFile True -OutputFormat Out-GridView

Feel free to tweak the parameter values for different results.

Explaination of parameters:

-TestFileName test.dat

The name of the file, it will create the file using FSUTIL, but it checks if it exists and if it does it stops, you can override that with the –RemoveTestFile True

–TestFileSizeInGB 1

Size of the file, it has fixed values, use the TAB key to flip through them

-TestFilepath C:\VMs

The folder can also be an UNC path, it will create the folder so it does not need to exist.

-TestMode Get-SmallIO

There is too test modes Get-LargeIO or Get-SmallIO, you use Get-LargeIO to measure the transfer rate and you use Get-SmallIO to measure IOPS

-FastMode True

Fast mode true runs each test for just 10 seconds, it gives you a hint, if you don’t set it or set it to false it will run for 60 sec (it will take a break for 10 sec between each run)

-RemoveTestFile True

Removes the test file if it exists

-OutputFormat Out-GridView

Choose between Out-Gridview or Format-Table


IOPS for C drive on Azure VM [OS Disk]:

C_drive


IOPS for D drive on Azure VM [Temporary Disk]:

D_drive


IOPS for E drive on Azure VM [Standard data disk]:

E_drive


IOPS for F drive on Azure VM [Storage Spaces]:

F_drive


We can use this storage strategy when we have a small amount of data but the IOPS requirement is huge.

Example scenario:

You have 500GB of data, and the IOPS for that data exceeds 1K. Storing 500GB of data in one data disk will create IOPS problems since each data disk has a 500 IOPS limit. But, if we combine 4 disks and create a storage space, the IOPS will increase to ~2k [we have to consider latency etc., to have a correct figure]. Since we are using the same Standard A2 virtual machine and Azure charges for the overall data and not per disk, the pricing will be the same.


Powershell – Script to Monitor Azure VM Availabilty

The idea behind writing this script is to have an automated solution to monitor availability of any Azure VMs. The script fetches the current server status, saves it in an Azure Table. Each script execution is one poll. So the second time the script runs, it fetches the current server status of VMs and then compares it to the previous value. If there are any changes to the server status during polling, such server details will be written to a hash table. Finally the details of the servers can be sent to an email.

Since we are monitoring the VM status from “RUNNING” to “VM STOPPED”, this will eliminate the scenarios, where VMs are stopped manually or as per a scheduled shutdown automation script. In these cases the VM status changes from “RUNNING” to “VM DEALLOCATED”.

Feel free to customize the script to add logic if you want to monitor the status of De-allocated VMs as well.

This script uses SendGrid as an email server. Feel free to add your SMTP address if you have one.

This script is useful when you do not yet have a fully automated monitoring like Nagios/OMS. Maybe you have a couple of servers that you want to monitor and do not want to spend more money on a custom monitoring. Simply create a runbook using this script as a baseline and schedule it in the Azure Automation Account.

The script is uploaded to the Microsoft Script Center. Please download it using the below link:

Monitor Azure VM Availability

Azure – Setting up Azure Subscription using PowerShell

The very fact that you are here reading this blog is because you have selected to manage your Azure service using Powreshell. Welcome to the team!!

I assume that you are already have a valid Azure subscription. Powershell 3.0 or higher and have the Windows Azure Powershell modules installed. If you do not have the Azure Powershell modules, you can download the Azure PowerShell module here.

Authenticating with a Certificate

You have to download the .publishsettings file from the Microsoft Azure . You can use the below command:

Get-AzurePublishSettingsFile

This will automatically ask you to select your favourite browser, so you can login to Microsoft Azure website.

get-publishfile

Now login with your credentials, that you always do with the Azure Portal

login

The file that we downloaded is very important and we have to handle it with a lot of care. Any one who can get their hands on this file, will have complete access to resources under that subscription. Microsoft imposes a limit on the total number of management certificates that can be associated with a subscription at a time. The number is 100 at the time of writing this blog. Each time you run the Get-AzurePublishSettingsFile cmdlet, Azure generates a new management certificate.

Importing the .pubishsettings file

The next step is to import the .publishsettings file that we just downloaded. I have saved in “E:\Work\Powershell\scripts”, so I am going to run the Import-AzurePublishSettingsFile cmdlet with the complete file path to the settings file.

Import-AzurePublishSettingsFile "E:\Work\Powershell\scripts\Pay-As-You-Go-9-9-2016-credentials.publishsettings"

import-settingfile

As you can see that the cmdlet outputs the subscription information, telling you that the settings are successfully imported.

To double confirm, you can run the Get-AzureSubscription cmdlet.

get-subscription

This cmdlet also tells you, if this subscription is your “Current” / “Default” subscription.

If you have multiple subscriptions, use the Set-AzureSubscription cmdlet to set any azure subscription as “Current” or “Default”.

Also, use the Select-AzureSubscription if you want to switch between subscriptions while working with Powershell.