Microsoft is investing a lot of money and effort into OMS (Operations Management Suite). OMS can be used to monitor Windows/Linux machines, not just in Azure, but also in AWS, or any cloud vendor platform for that matter. You can even monitor the servers hosted in your on-premise environment.
Configuring OMS for Azure instance is pretty straightforward. I will walk you through on how to configure OMS on Windows AWS instance.
I already have a OMS workspace (with an Azure subscription)
Step 1: Create and connect to your AWS Windows instance, by following the below link as guidance:
http://docs.aws.amazon.com/codedeploy/latest/userguide/tutorials-windows-launch-instance.html
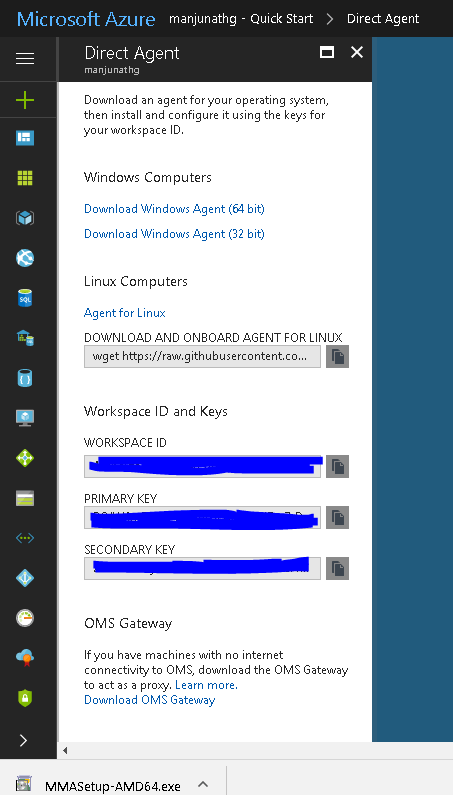
Step 2: Download the OMS direct agent for Windows Machine.
Option1: If you are using an Azure subscription to manage OMS, then you can find the link to download the direct agent by clicking on:
Selecting your OMS workspace >> Select “Quick Start” >> Select “Computers” >> Select “Download Windows Agent (64 bit)”

Option 2: You can download the OMS direct agent, from the OMS portal as well.
Click on the “gear button” (third icon from left) located at the top right-hand corner of the portal >> select “Connected Sources” >> Select “Windows Servers” >> Click on “Download Windows Agent (64 bit)”

Once the “MMASetup-AMD64.exe” file is downloaded to your local desktop. Copy the file to the AWS Windows instance where you are configuring the OMS agent.
Now, double click on the “MMASetup-AMD64.exe” to start installing.
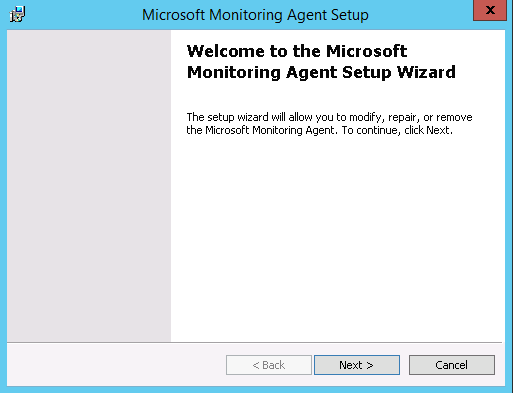
Click “Next”

Click on “I Agree” once you have read the legal terms.

Select the installation folder, if you are not happy with the default location. Then click “Next”

Select the checkbox “Connect the agent to Azure Log Analytics (OMS)” and then click “Next”.

Enter your OMS workspace details. You can find this information from Azure portal or OMS portal. It is the same page from where we download the Direct Agent for Windows.
[Optional] Click on the “Advanced” button, if your server has to go through a proxy server. Make necessary changes and click “Next”. Since I do not use a proxy server to connect to the OMS, I am leaving the fields as blank.

Click “Next” on the above page takes you back to the page where you updated the OMS workspace ID and key. Now click “Next” to proceed.

Select accordingly, if you need Microsoft updates or not. Then click “Next”.

Review your settings/data. Click on “Install”.

Now click on “Finish”.
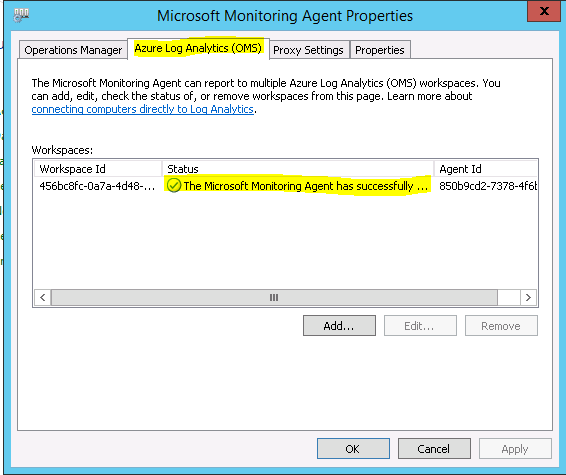
Step 3: Verify connectivity to OMS workspace
Open Control Panel >> Select “Microsoft Monitoring Agent”

Select “Azure Log Analytics (OMS)” tab. You can see that your windows agent has successfully connected to the Microsoft Operations Managment Suite service.
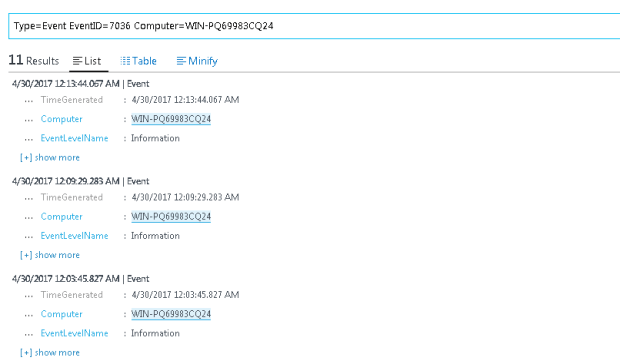
Step 4: Verify log from AWS windows instance to OMS
From the OMS portal, we can see that our AWS windows instance is connected. [WIN-PQ69983CQ24 is my AWS windows instance name]

A simple Log Search will give us data fetched from the instance.