windows powershell

Azure – Who de-allocated my virtual machine?

Many a time we might want to know details about certain operations performed on our Azure resources.

Once such case study would be to track how many virtual machines are being de-allocated by users, so we can make a decision on not to monitor them.

I have written a simple script that would make the tracking easy.

Download the script

This script will fetch information of certain Azure operation against Azure resources and create a CSV file. Specifically, this script will create a CSV file that contains a list of Azure operations that de-allocates an Azure virtual machine.

You may alter the IF condition statement to produce desired results.

Example, fetch operational logs for Azure Storage only. Or fetch operational logs for re-start VM or any operation on any Azure resource.

The CSV file will be saved in the same folder from where you run the script and will be saved as “Azure_activity_logs.csv”

Click here to download my PowerShell scripts for Free !!

Click here for Azure tutorial videos !!

Advertisement

Powershell – Truth about default formatting

Have you ever ran a powershell cmdlet and stare at the output, and ever wondered, what makes Powershell display the results in such a way? Is there any hidden configuration that guides the powershell engine to display results in a specific format for one cmdlet and in a different format for another cmdlet??

Read along. This blog will answer your curiosity !


Example: Below is the output of Get-service

get-service


Below is the output of Get-Process

get-process


The answer is Yes. The Powershell Engine is indeed guided by a configuration file that tells powershell on how to display the results. Or we call it as the “Default rules for Formatting” (not an official name :))

You will find the configuration files in the Powershell Installation Folder. Use the “$pshome” variable to find out the Powershell Installation Folder.

PS E:\Work\Powershell\scripts> $pshome
C:\Windows\System32\WindowsPowerShell\v1.0

Change the directory to the Powershell Installation directory and you must be able to find a file named “DotNetTypes.format.ps1xml”.

pshome

Please be cautious, not to edit the file. As it will break the signature and the PowerShell will not be able to use it anymore.

If you want to find out the default rules that are applied, then simply open the file and search for the cmdlet.

Example: If I want to know the default rules for the “Get-Service” cmdlet, I search the file for the keyword “service”. Note that the keyword “Service” should be enclosed within the “Name” tags. That is the correct one. As per the below image.

dotnettypes


You can double confirm if it is the correct branch, using the “<TypeName>” tag. This value should equate to the TypeName when you do a Get-Member of that cmdlet.

Example: “System.ServiceProcess.ServiceController” for Get-Service

Now what you are looking in the file are set of directions that the Powershell Engine follows. If you can see in the preceding lines, we can see a <TableControl> tag, which says, that the output should be in the form of table. Next few lines specifies the attributes of the table, such as Width and Height.


When you run Get-Service, here’s what happens:

  1. The cmdlet places objects of the type System.ServiceProcess.ServiceController into the pipeline.
  2. At the end of the pipeline is an invisible cmdlet called Out-Default. It is always there, and it’s job is to pick up what ever objects are in the pipeline after all the commands have run.
  3. Out-Default passes the objects to Out-Host, because the PowerShell console is designed to use the screen (called the host) as it’s default form of output.
  4. Most of the Out- cmdlets are incapable of working with normal objects. Instead, they are designed to work with special formatting instructions. So when Out-Host sees that it has been handed normal objects, it passes them to the formatting system.
  5. The formatting system looks at the type of the object and follow an internal set of formatting rules. It uses those rules to produce formatting instructions, which are passed back to Out-Host.
  6. Once Out-Host sees that it has formatting instructions, it follows those instructions  to construct the onscreen display.

So when you run the below cmdlet,

 Get-Process | Out-File process.txt

The out-File will see the normal objects. It will pass them to the formatting system, which will create formatting instructions and then passes back them to the Out-File. The Out-File then constructs the file based on those formatting instructions.

Below are the formatting rules:

  • First Rule: The System looks to see if the type of object it is dealing with has a predefined view. That is what you saw in the DotNetTypes.format.ps1xml.  There are other .format.ps1xml files installed with Powershell, and they are loaded when the powershell starts. You can create your own predefined views as well.


  • Second Rule: If the system is not able to find a predefined view, then it will look to see if anyone has declared a “default display property set” for that type of object. You can find that in a configuration file called- “Types.ps1xml” (under the Powershell Home directory)


defaultpropertyset

Go back to Powershell and Run:

Get-WmiObject win32_operatingsystem

get-wmiobject

I guess, now you know from where these entries came from. The properties you see are present because they are listed as defaults in the Types.ps1xml. If the formatting system finds a “default display property set”, it will use those set of properties.


  • Third Rule: It is about what kind of output to create. If the formatting system will display four or fewer properties, it will use a table. If there are five or more properties, then it will display the results as a list. This is why the Win32_OperatingSystem object was not displayed as a table, as it contained six properties, triggering a list. The theory is that more than 4 properties might not fit into a table, without truncating information.

Powershell – Importance of the position of “Format-” in a pipeline

We have all used the Format-Table, Format-List, Format-Wide cmdlets to make our output more attractive. We know the importance of the Format- cmdlets now. But are we aware of the importance of the position of Format- cmdlets in the pipeline??

Have a look into the below three cmdlet examples:

Get-Process | Format-Table

get-process


Get-Process | Get-Member


get-process

Get-Process | Format-Table | Get-Member

get-member

When we do a Get-Member, why are we getting “Microsoft.PowerShell.Commands.Internal.Format.FormatStartData” or “Microsoft.PowerShell.Commands.Internal.Format.GroupStartData” instead of  “System.Diagnostics.Process”, with just adding “Format-Table” in the pipeline.

The reason is that the Format-Table cmdlet does not output process objects. It consumes the process objects that you piped in and it outputs the formatting instructions – which is what the Get-Member sees and reports on.

Now try the below cmdlet:

Get-Service | select name, displayname, status | Format-Table | ConvertTo-Html | Out-File services.html

Open the services.html file with your favorite browser and you will be surprised to see the contents of that file, since it does not contain any of the service objects (which you were expecting). This is because you did not pipe the service objects to the ConvertTo-Html cmdlet, instead you have piped the formatting instructions.

This is the reason why the “Format-” cmdlets have to be the last thing on the pipeline.


One Object At A Time

We have to avoid putting multiple types of objects into the pipeline. This is because the pipeline is designed to handle only one type of objects.

Enter the cmdlets as below and run them, you will understand what I just said:

Get-Process; Get-Service

The semicolon allows me to put two cmdlets into the single command line, without having to pipe the output of the first cmdlet to the second one. In other words, both the cmdlets will run independently, however they will put the output to the same pipeline.

process-service


As you can see in the figure above, the output starts fine, displaying process objects. But the output breaks when displaying the service objects. Rather than producing a table for the service objects, PowerShell reverts to a list.

The  formatting system looks at the first object in the pipeline and uses the type of that object to determine what formatting to produce. If the pipeline contains two or more kinds of objects, the output will not always be complete or useful.

Powershell – Understanding Select-Object

Understanding how “Select-Object” works, can differentiate an average from a good Powershell user. So lets dedicate some time in understanding how Select-Object works.

Select-Object is mainly used to override the default display of the cmdlets. Example:

select

When you run the Get-Service cmdlet, the output displays the Status, Name and DisplayName. By piping the output of Get-Service to Select-Object, you can override the default display for that object type.

(Piping the Get-Service output to Get-Member, allows you to understand what other properties can be used with the Select-Object)

Select-Object changes the object type

Notice the below two examples and observe the TypeName in both the case.

Get-Service | gm

get-service

Get-Service | Select-Object name | gm

get-service-select

From the above two outputs, you can clearly see that the Select-Object is changing the object from System.ServiceProcess.ServiceController to Selected.System.ServiceProcess.ServiceController. That, it is “Selecting” only few properties from the “original” service object. Now, you will not be able to treat the new object as a service object. Hence you cannot run the operations that you were running on the good-old service object. Hence, the Select-Object HAS to be the last cmdlet in the pipeline.

Selecting subset of objects

Select-Object allows us to choose a subset of objects either from the beginning, from the end, or a chunk of object from a random range. Powershell provides, “First”, “Last” and “Skip” parameters just for these operations.

We are running the below three cmdlets as a demonstration:

Get-Service | Sort-Object name | Select-Object -first 5

Get-Service | Sort-Object name | Select-Object -last 5

Get-Service | Sort-Object name | Select-Object -first 3 -Skip 2

subset

Note: No matter in which order you are specifying the parameters to the Select-Object. If you have specified -Skip, it will ALWAYS execute first, and then -First or -Last (if you have specified along with skip).

Select-Object allows Custom Properties

Custom Properties are the ones which do not come pre-loaded with Powershell. instead they are dynamically created by the user on the go.

Example:

Get-Process | select name, id, @{label='TotalMemory';expression={($_.pm + $_.vm)/ 1MB -as [int]}}

custom properties

What did we just do?

  • We wanted to calculate the TotalMemory of a service. Since we do not have a default parameter that provides us this value. We decided to create a custom property of our own.
  • The structure starting with ‘@‘ sign is called a hash table. A Hash Table contains entries in the form of a name-value pair. Custom Properties comes with two pairs. Each pair is separated by a semi-colon.
  • The first key is called as “Label” or “Name“. The value for this key is what you want to appear in the column header of your custom property.
  • The second key is called the “Expression“. The value for this key,  is the code for the powershell to run/execute to create the resulting row in the custom property.
  • The $_ holder is a place holder for the current object in the pipeline. This can be replaced by $PSItem, both have same meaning.
  • Each @ structure represents a single custom property. You can have as many custom property as you like.

Expanding Properties

Imagine a situation, you want to grab process from the computers [dc=company, dc=pri] in your Active Directory.

You are sure that the below command will fetch the desired computers from the Active Directory.

Get-AdComputer -Filter * -SearchBase "dc=company, dc=pri"

And you also know that the Get-Process has a -ComputerName as a parameter. So you go ahead an happily run the below command:

Get-Process -ComputerName (Get-AdComputer -Filter * -SearchBase "dc=company, dc=pri")

To your surprise the command does not generate the desired result. This is because the Get-AdComputer is generating ADComputer objects. However, the -ComputerName parameter in the Get-Process cmdlet is asking for String[] type input. This is where the -ExpandProperty parameter of the Select-Object shines.

Have a look at this command:

Get-Process -ComputerName (Get-AdComputer -Filter * -SearchBase "dc=company, dc=pri" | Select-Object -ExpandProperty Name)

When Powershell executes this command, it is fetching the desired computers and then expanding the Name property. This has an effect of writing a collection of string to the pipeline, instead of bunch of objects.

-ExpandProperty is a handy technique when you want to save property value to variable.

bits1

As shown above, the Select-Object wrote a ServiceController object into the variable. Hence we need to use a sub-expression to fetch the display name.

bits2

In this case, the Select-Object wrote a String into the variable. This way, it is very easy to access the display name. You can expand single property or a bunch or properties.

From Powershell v3, we have a shortcut way to implicitly expand a property:

(Get-Process).name

implicit

Confirming that the output were String objects:

(Get-Process).name | gm

implicit 2

Some properties are collection of other objects. Example:

expanding1

We can use the -ExpandProperty to “expand” them into their stand-alone objects.

expanding2

We can also use the shortcut trick to get the same results.

expanding3

Powershell – Debugging Techniques

This blog discuses some high level Debugging Techniques while working with Powershell. The contents of this blog are taken from the book – “Learn WINDOWS POWERSHELL, In a month of Lunches” By, Don Jones (All the credit goes to Don)

I am writing this blog, because we do not have enuf content on the web that discusses about the “Debugging” or “Troubleshooting” approaches while working with Powershell. And Don’s book helped me a lot in my personal endeavour. Now it is my turn to give it back to the Powershell Community.

First Computer Bug

There are two broad categories of bugs in the Powershell world. Firstly, the syntax errors and secondly, logic errors.

Syntax Errors

A Syntax Error means you typed something wrong. It might be a command name that you misspelled (Gte-Content instead of Get-Content) or it might be that you got the actual syntax of the command wrong (forgetting the hyphen between the verb and noun of a cmdlet name, or using a colon instead of a space to separate a parameter’s name and value). Whatever the cause, correcting your typing will solve the problem.

Powershell will usually tell you, in explicit detail, where the problem is. Powershell might not know what the problem is, but it will usually get pretty close to the location of the error. Example, here is a syntactically incorrect command and the resulting error message:

get-content

That is pretty clear: We used a parameter named -file, and Powershell could not find one. The error occurred on the line 1 of my  command and at character position 18.

Here is a checklist that will help you in overcoming the Syntax Errors:

  •  Make sure you typed the cmdlet name correctly. If you used an alias, make sure it is typed correctly, and that it points to the cmdlet you think it does.
  • Make sure parameter names are preceded by a dash and are followed by a space. Make sure you are using the correct parameter name (read the help!) and if you are abbreviating the parameter name, make sure you are providing enough characters to uniquely identify that parameter.
  • Most of the Powershell’s punctuation comes in pairs: single quotes, double quotes, square brackets, curly braces, and parenthesis are all good examples. Improper nesting, like ({this)}, means you are ending a pair before ending the pair it encloses.
  • Watch your spaces. In Powershell, spaces are special characters that indicate a separation between command elements. Powershell is not that case-sensitive, but it is very space-sensitive. There is a space in between parameter names and values. There is a space after a cmdlet name and before any parameter or values. There is a space after one parameter and before the next. Do not forget those.

Red Alert

The RED Text usually freaks us out. You can change the colour of the error message text to green.

(Get-Host).PrivateData.ErrorForegroundColor = 'green'

That only lasts for the duration of the shell session, so we can either put that in a profile script or we can do it before start working in the shell.

Logic Errors

Logic errors mean that your script or command is not doing what you want it to do, but it is not necessarily generating an error.

Some logic error will provide straightforward errors. You should know what to do with a  “file not found” error, or an “access denied” message, but sometimes errors are not always so clear, Get-WmiObject, for example, can produce an “RPC server not found” error if it is not able to locate a remote computer, etc.,

But the most vexing logic errors are the ones that do not produce any error at all – they just prevent your script or command from working properly. Check the below code snippet:

$name = Read-Host "Enter computer name"
if (Test-Connection $name) {
    Get-WmiObject Win32_BIOS -ComputerName $nmae
}

Logic errors, like syntax errors, can come from typos and one of such errors is listed in the above code snippet.

Debugging causes a lot of frustration, and we need to know the below things before we debug any script or command:

  • You cannot debug a script or command unless you have a clear expectation of what it is going to do.
  • You must execute your script an examine its reality (what  it actually does), and compare that reality to your expectations. When reality and your expectations differ, you have found the bug.
  • While executing the script and examining it, you need to read very, very carefully, so that you can spot typos. Sometimes using a different font can help.

Identifying your expectations

If you do not know what a command or a script should do, then you can never debug it. We are using the same code snippet as above to see the process involved.

$name = Read-Host "Enter computer name"

I expect that this will display “Enter Computer name:” on the screen, and allow me to type something. What ever I type will be stored in the variable $name.

if (Test-Connection $name) {

My expectation is that this will run the Test-Connection command, passing it the computer name in $name. I expect that this will ping the computer name I typed. I see that this is enclosed in an IF construct, so I expect that Test-Connection must return a True or False value. So, if the computer can be pinged, it will return True, and whatever is inside the IF construct will execute next.

Get-WmiObject Win32_BIOS -ComputerName $name

I expect that this will return Get-WmiObject and retrieve the Win32_BIOS class. We know that -class is the first parameter, so the Win32_BIOS will be fed to the -class parameter. I see that the -computername parameter is also specified, and it is being passed the computer name from the $name variable. Oh, wait – there is a typo. See, just a careful read-through of the script found a problem. I am going to leave the typo in there, though, and pretend that I was not being so careful with it (for now). I want to show you some other ways that you might have found it.

}

That closes the IF construct. With my expectations written down, it is time to start seeing where they differ from reality.

Adding Trace Code

The first trick is to add trace code to the script. It all starts with a helpful command called Write-Debug, which simply takes a message that you want it to display.

Write-Debug "Test Message

If you are following along, you will notice that Write-Debug will not produce any output.

Write-Debug actually sends your message to an alternate pipeline called Debug pipeline. Powershell has several of these alternate pipelines: Error, Warning, Debug and so forth. By default, the Debug pipeline’s switch  is set to SilentlyContinue, which is the same as OFF. The result is that all Write-Debug messages are suppressed.

Lets go ahead and change the setting in the script by adding this to the top:

$DebugPreference = "Continue"

Now we are free to add Write-Host statements to our script. Below is the revised script:

$DebugPreference = "Continue"

$name = Read-Host "Enter computer name"
Write-Debug "`$name contains $name"

if (Test-Connection $name) {
Write-Debug "Test-Connection was True"
    Get-WmiObject Win32_BIOS -ComputerName $nmae
} else {
    Write-Debug "Test-Connection was False"
}
You can see that I have added a Write-Debug to the inside of the IF construct, I even added an Else potion to the construct, containing a third Write-Debug message. That way, no matter which way the IF construct’s logic goes, I’ll see some output and know what is happening inside the script.
If you run the command, you will get the below error:
typo
That is where you will realize that there is a typo in that $name variable. Powershell is clearly telling us that there is a problem with the -computername parameter; if we look carefully at just that portion of the script, the $nmae typo is more obvious.
After fixing that and running  the script again:
notypo
That looks like what we want.
Now, we need to test the opposite situation, what happens when we provide a computer name that is not valid?
testfailed
That is certainly not what we are looking for. That is a logic error: the Test-Connection cmdlet clearly is not doing what I expected, which was to return a simple True or False value.
Stepping out of the script and just work with the Test-Connection from the command line:
tesst-connection
failagainOkay, that is definitely not what I expected. When I used the command with a valid computer name, I get back a table of results, not a True or False value. When I use it with an invalid computer name, I still get an error.
Reading the help, Help Test-Connection -full. I see that the command “returns the echo response replies”. The help also says that, “unlike the traditional ‘ping’ command, Test-Connection returns a Win32_PingStatus Object… bot you can use the -quiet parameter to force it to return only a Boolean value.” Yes, Please !
Looking at the -quiet parameter, I see it “supresses all errors and return $True if any pings succeed and $False if all failed.” That is what I want, so I will modify the script accordingly.
$DebugPreference = "Continue"

$name = Read-Host "Enter computer name"
Write-Debug "`$name contains $name"

if (Test-Connection $name -Quiet) {
Write-Debug "Test-Connection was True"
    Get-WmiObject Win32_BIOS -ComputerName $name
} else {
    Write-Debug "Test-Connection was False"
}
Running the script again, testing it with both a valid and invalid computer name. Below is the output:
works
In short:
  • Whenever I change the contents of a variable, I use Write-Debug to output the variable, just to I can check those contents.
  • Whenever I am going to read the value of a property or a variable, I use Write-Debug to output that property or variable, so that I can see what is going on inside the script.
  • Any time I have a loop or logic construct, I build it in such a way that I get a Write-Debug message no matter how the loop or logic works out.

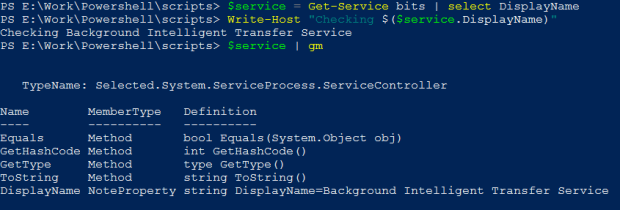
Working with break points

Having to wade through a lot of debug messages is cumbersome in lengthy /complex scripts. So we fall to use Breakpoints, to make the debugging process a bit easy.

A breakpoint is a defined area where a script will pause its execution, allowing you to examine the environment that the script is running within. Powershell can be configured to break when:

  • Your script reaches a certain line
  • A variable is read and/or changed
  • A specific command is executed

In the first instance, you must specify the script that you are referring to. In the second and third situations, you can choose to specify a script, and the breaking point will only be active for that script. If you don’t, the breakpoint will occur globally through out the shell when that variable is read or written, or that command is executed.

Example, suppose I want to have the script stop immediately after Line 1 finishes executing, meaning that I want to break before the Line 2. Then I will run the command:

Set-PSBreakpoint -Script E:\Work\Powershell\scripts\demo.ps1 -Line 2

breakpoint

I also want to be notified whenever the $name variable is accessed, so I will run the below command:

Set-PSBreakpoint -Script E:\Work\Powershell\scripts\demo.ps1 -Variable name -mode Read

anotherbreakpoint

Notice that the variable name is just “name” and not “$name”. Variable names do not  include the dollar sign; $ is just a cue to the shell telling it that you wish to use the contents of a variable.

With those two breakpoints set, I will run the script. After entering the computer name, the script will break. The shell modifies the command-line prompt, indicating that I am in a suspended mode. Here I can examine the contents of variables, execute commands and so on. When I am done, I can run Exit to resume script execution. Here is how it all works:

breakpointfinal

This gives me the chance to test commands, see what is inside variables or properties, and so forth, without having to add a  lot of write-debug commands.

When I am done debugging, I can remove the breakpoints:

Get-PSBreakpoint | Remove-PSBreakpoint

Breakpoints are also supported in Powershell ISE. To set a line breakpoint, move your cursor to the desired line and press F9.The ISE will visually indicate where line breakpoints occur, using a red highlight. If you run the script within the ISE, breakpoints lines will be highlighted in yellow when the script reaches one of those lines. At that time, you can hover your cursor over any variable to see a tooltip with the contents of that variable.


Powershell – Who locked my folder?

Lets face it, we all have been in that weird situation, where we want to delete a folder and we get a prompt saying – “The action can’t be completed because the file is open in another program”. If we are aware of such a program (process), that is using our file, then we can just go and kill that process.

But what if we have 100s of files in that folder and multiple processes running? How do we pin point the culprit process that is using the random file, under the folder that we are trying to delete.

I know that there are a few third-party software’s that are available to solve this issue. Since we are Powershell Lovers, lets solve this problem the Powershell way.

In my demonstration, I have a text document called “demo.txt” under the folder, “E:\Work\Powershell\scripts\demo”. Now, I open that file using a notepad. When I try to delete the folder “demo”, I will get the below warning.

cant delete

To solve this problem, we can query the Win32_Process WMI class to find out the culprit process that is using our file.

Run the below cmdlet:

$location = 'E:\Work\Powershell\scripts\demo'
Get-WmiObject Win32_Process | where {$_.commandLine -like "*$location*"} | select name

gotyou

From the screen shot, you can see that we accurately spotted that the “notepad.exe” process was using our file. We can now terminate the process and then proceed in deleting the file.

This cmdlet can be used as a template or as a starting phase to develop more complicated logic/script accordingly.


Powershell – Writing a Filtering Function

We are discussing on how to write a Powershell Function. This is part 2 of the three part series. Please check my blog on Parameterized function, which is the part 1 of this series.

The second type of function is called a Filtering Function or also called as Pipeline Function.

  • You can accept one kind of information through the pipeline. This might be computer names, processes, or any other kind of single kind of information.
  • What ever you accept through the pipeline can come as a single object, or multiple objects can be piped in. You will write one (or many) commands that execute against each piped-in object, no matter how many there are.
  • You can designate additional parameters for other input elements. The values provided to these parameters will be used for each execution of your commands.
Below is an example of a Filtering function:

function Get-ServerInfo {

BEGIN{}

PROCESS{
 $computername = $_

$os = Get-WmiObject Win32_OperatingSystem -ComputerName $computername

$disk = Get-WmiObject Win32_LogicalDisk -Filter "DeviceID='C:'" -ComputerName $computername


 $obj = New-Object -TypeName PSObject

$obj | Add-Member -MemberType NoteProperty -Name ComputerName -Value $computername
 $obj | Add-Member -MemberType NoteProperty -Name BuildNumber -Value ($os.BuildNumber)
 $obj | Add-Member -MemberType NoteProperty -Name SPVersion -Value ($os.ServicePackMajorVersion)
 $obj | Add-Member -MemberType NoteProperty -Name SysDriveFree -Value ($disk.free / 1MB -as [int])

Write-Output $obj
 
 }

END{}

}

Get-Content names.txt | Get-ServerInfo | Format-Table -AutoSize

Here is what we did:

  • We have added a BEGIN, PROCESS and END block
  • What ever is in the BEGIN block will execute the first time this function is called in the pipeline; the END block will execute when the function is almost finished.
  • The PROCESS script block will execute one time for each object that is piped into the function. (If you do not pipe any input then PROCESS block will execute once)
  • This script expects computer names to be piped in, so if you pipe four names, the PROCESS block will execute four times. Each time, the “$_” placeholder will be automatically populated with a new object from the pipeline.
  • The last line of the script shows how you would execute this function: pipe a bunch of string objects to it.


Adding a parameter to a filtering function

What if we want the cmdlet to accept computer names either from the pipeline or from a parameter? In other words, you want both of theses to work:

Get-Content names.txt | Get-ServerInfo

Get-ServerInfo -computername (Get-Content names.txt)

Rite now the function does not accept parameters, so lets include a parameter.

function Get-ServerInfo {

param (
 [String] $computername
 )

BEGIN{}

PROCESS{
 $computername = $_

$os = Get-WmiObject Win32_OperatingSystem -ComputerName $computername

$disk = Get-WmiObject Win32_LogicalDisk -Filter "DeviceID='C:'" -ComputerName $computername


 $obj = New-Object -TypeName PSObject

$obj | Add-Member -MemberType NoteProperty -Name ComputerName -Value $computername
 $obj | Add-Member -MemberType NoteProperty -Name BuildNumber -Value ($os.BuildNumber)
 $obj | Add-Member -MemberType NoteProperty -Name SPVersion -Value ($os.ServicePackMajorVersion)
 $obj | Add-Member -MemberType NoteProperty -Name SysDriveFree -Value ($disk.free / 1MB -as [int])

Write-Output $obj
 
 }

END{}
}

Get-Content names.txt | Get-ServerInfo | Format-Table -AutoSize

However, we run into a problem. The original way of running the command – which is included at the bottom if the script listing – will continue to work. But the other way of running the function does not work.

Get-ServerInfo -computername vaio

Get-WmiObject : Cannot validate argument on parameter 'ComputerName'. The argument is null or 
empty. Supply an argument that is not null or empty and then try the command again.
At line:12 char:65
+ $os = Get-WmiObject Win32_OperatingSystem -ComputerName $computername
+ ~~~~~~~~~~~~~
 + CategoryInfo : InvalidData: (:) [Get-WmiObject], ParameterBindingValidationExcepti 
 on
 + FullyQualifiedErrorId : ParameterArgumentValidationError,Microsoft.PowerShell.Commands.GetW 
 miObjectCommand
 
Get-WmiObject : Cannot validate argument on parameter 'ComputerName'. The argument is null or 
empty. Supply an argument that is not null or empty and then try the command again.
At line:14 char:87
+ ... -ComputerName $computername
+ ~~~~~~~~~~~~~
 + CategoryInfo : InvalidData: (:) [Get-WmiObject], ParameterBindingValidationExcepti 
 on
 + FullyQualifiedErrorId : ParameterArgumentValidationError,Microsoft.PowerShell.Commands.GetW 
 miObjectCommand

This is because, all of the code in the function lives within the PROCESS block. We are taking the computer name from the $_ placeholder, which is populated with an object from the pipeline input. Except that we did not pipe anything in, so the PROCESS block only executes once, and $_ never contains anything, so $computername never contains anything, so nothing works.


Breaking the function into two parts

So, to fix the issue, we need to break the function into two pieces. The main working part can stand alone and can be used whether you are getting input from the pipeline or from a parameter, called as worker function. The second part will be the public function that you want people to actually use. It’s job is to determine, where the input is coming from and to pass the one computer name at a time to the worker function.

We have two things to keep in mind:

  • When input comes from the pipeline, the shell will enumerate through the objects automatically, allowing you to work with one at a time. You can pass those objects, as they are processed, to the worker function.
  • When the input comes form a parameter, you may gave either one object or many objects, but the PROCESS script block will only execute once regardless. So you will have to manually enumerate the parameter so that you can get to each object, one at a time.

We have a Powershell’s built in variable called $PSBoundParameters, and it contains each parameter that was manually specified. It has a ContainsKey() method that will let you test to see if a particular parameter was used or not.

function GetServerInfoWork {
 param (
 [String]$computername
 )

$os = Get-WmiObject Win32_OperatingSystem -ComputerName $computername

$disk = Get-WmiObject Win32_LogicalDisk -Filter "DeviceID='C:'" -ComputerName $computername


 $obj = New-Object -TypeName PSObject

$obj | Add-Member -MemberType NoteProperty -Name ComputerName -Value $computername
 $obj | Add-Member -MemberType NoteProperty -Name BuildNumber -Value ($os.BuildNumber)
 $obj | Add-Member -MemberType NoteProperty -Name SPVersion -Value ($os.ServicePackMajorVersion)
 $obj | Add-Member -MemberType NoteProperty -Name SysDriveFree -Value ($disk.free / 1MB -as [int])

Write-Output $obj

}

function Get-ServerInfo {
 param(
 [String[]]$computername
 )

BEGIN{
 $usedParameter = $false
 if($PSBoundParameters.ContainsKey('computername')){
 $usedParameter = $true
 }

}

PROCESS{
 if($usedParameter) {
 foreach($computer in $computername) {
 GetServerInfoWork -computername $computer
 }else {
 GetServerInfoWork -computername $_
 }
 }

}

END{}
}

Get-ServerInfo -verbose -computername (Get-Content E:\Work\Powershell\scripts\names.txt.txt)
Get-Content E:\Work\Powershell\scripts\names.txt.txt | Get-ServerInfo | Format-Table -AutoSize

Here is what we did :

  • We started by pulling most of the function code into a worker function.
  • In the public function, we declared the parameter to accept multiple stings
  • In the BEGIN block, which execute first, we want to see  if the input is coming from the pipeline or via the parameter. We start by assuming that the input came from the pipeline, setting $usedParameter to $false. Then test the $PSBoundParameters variable, and if it does indeed contain the comptername key, then we know that the  -computername parameter was used, so we set the $usedParameter to $true.
  • Even though the $usedParameter is created in the BEGIN block, it will be accessible in the PROCESS and END block.
  • In the PROCESS block, we check the variable to see what to do.
  • We use a foreach loop to enumerate the parameter input, passing each object to the worker function one at a time.
  • If the input came from the pipeline, the PROCESS block is already handling the enumeration, so we let it do its job and pass the $_ placeholder’s contents to the workers function.

Powershell – Writing a parameterized function

As a system administrator or an ITPro we need to run cmdlets to administer our environment. Using powershell, administrating gets pretty easy. But if you have to run same cmdlets again and again for multiple boxes, the process may be tiring or irritating. We need a way  to tell the powershell to do tasks repeatedly, without our intervention (unless it is necessary), and a way to achieve modularity among the tasks that we perform. This can be achieved using functions.

We will be talking about three different types of functions in a three part series. In this blog we will discuss about the simplest form of a function called – Parameterized function.

Lets look at the two cmdlets below:

Get-WmiObject Win32_OperatingSystem -ComputerName vaio | select @{l='ComputerName';e={$_.__SERVER}}, BuildNumber, ServicePackMajorVersion
Get-WmiObject Win32_LogicalDisk -Filter "DeviceID='C:'" -ComputerName vaio | select @{l='SysDriveFree(MB)';e={$_.Freespace/1MB -as [int]}}

We can run them in the shell. The problem is that these two commands will return two independent sets of results. Another problem is that the computer name is hard coded.

To achieve modulatity, we can break down the task into 3 steps:

  • We need to get a computer name or several computer names from someplace.
  • We have to retrieve the Win32_OperatingSystem WMI Class.
  • We have to retrieve the Win32_LogicalDisk WMI Class.

Trying to get all the output into a single table

$computername = 'vaio'

$os = Get-WmiObject Win32_OperatingSystem -ComputerName vaio | select @{l='ComputerName';e={$_.__SERVER}}, BuildNumber, ServicePackMajorVersion

$disk = Get-WmiObject Win32_LogicalDisk -Filter "DeviceID='C:'" -ComputerName vaio | select @{l='SysDriveFree(MB)';e={$_.Freespace/1MB -as [int]}}

Write-Host "Computer`tBuildNumber`tSPVersion`tFreeSpace"
Write-Host "========`t==========`t==========`t========="
Write-Host ("{0}`t{1}`t{2}`t{3}" -f ($os.ComputerName),($os.BuildNumber),($os.ServicePackMajorVersion),($disk.'SysDriveFree(MB)'))

The output format is not that great, but the information is what we need.

What we did in the above code was:

  • We have kept the computer name in a variable.
  • We are using Write-Host to create a table header.
  • We are using -f to format the table row.

Wrapping the code in a function

We want to modularize our code into function, which is a self-contained, stand alone unit of work that we can distribute easily. An easy way make a function is to wrap it in a function declaration, as shown here:

function Get-ServerInfo {

$computername = 'vaio'

$os = Get-WmiObject Win32_OperatingSystem -ComputerName vaio | select @{l='ComputerName';e={$_.__SERVER}}, BuildNumber, ServicePackMajorVersion

$disk = Get-WmiObject Win32_LogicalDisk -Filter "DeviceID='C:'" -ComputerName vaio | select @{l='SysDriveFree(MB)';e={$_.Freespace/1MB -as [int]}}

Write-Host "Computer`tBuildNumber`tSPVersion`tFreeSpace"
 Write-Host "========`t==========`t==========`t========="
 Write-Host ("{0}`t{1}`t{2}`t{3}" -f ($os.ComputerName),($os.BuildNumber),($os.ServicePackMajorVersion),($disk.'SysDriveFree(MB)'))

}

Parameterizing the function

We need to change something in the function, as we do not want the computer name to always be ‘vaio’. The solution is to change the $computername from a variable into a parameter, which we can do by adding it to a Param() block, at the top of the function.

function Get-ServerInfo {

param {
 $computername = 'localhost'
 }

$os = Get-WmiObject Win32_OperatingSystem -ComputerName vaio | select @{l='ComputerName';e={$_.__SERVER}}, BuildNumber, ServicePackMajorVersion

$disk = Get-WmiObject Win32_LogicalDisk -Filter "DeviceID='C:'" -ComputerName vaio | select @{l='SysDriveFree(MB)';e={$_.Freespace/1MB -as [int]}}

Write-Host "Computer`tBuildNumber`tSPVersion`tFreeSpace"
 Write-Host "========`t==========`t==========`t========="
 Write-Host ("{0}`t{1}`t{2}`t{3}" -f ($os.ComputerName),($os.BuildNumber),($os.ServicePackMajorVersion),($disk.'SysDriveFree(MB)'))

}

You can see that, we have set the $computername equal to ‘localhost’. That will now serve as a default value. If someone runs this function without specifying a computer name, the function will target ‘localhost’, which is usually a safe operation.

Now, the function can be given any alternative computer name in any of these ways:

Get-ServerInfo -computername vaio

Get-ServerInfo -comp vaio

Get-ServerInfo vaio

Returning Objects from function

Powershell does not really like text – it likes Objects. What we have been doing so far in our function is attempting to format our output as a text table. By doing so we are working against Powershell’s native capabilities, which we are making it harder to get the output we want. That means, we need to stop trying to output texts and instead output objects.

Because we are getting information from two places – Win32_OperatingSystem and Win32_LogicalDisk, we cannot output either of the objects that we got back from WMI. Instead we will create a new blank object [PSObject], that we can use to combine our four pieces of information. We simply need to create a PSObject and add the information in the form of properties.

function Get-ServerInfo {

param (
 $computername = 'localhost'
 )

 $os = Get-WmiObject Win32_OperatingSystem -ComputerName $computername

 $disk = Get-WmiObject Win32_LogicalDisk -Filter "DeviceID='C:'" -ComputerName $computername

 $obj = New-Object -TypeName PSObject

$obj | Add-Member -MemberType NoteProperty -Name ComputerName -Value $computername
 $obj | Add-Member -MemberType NoteProperty -Name BuildNumber -Value ($os.BuildNumber)
 $obj | Add-Member -MemberType NoteProperty -Name SPVersion -Value ($os.ServicePackMajorVersion)
 $obj | Add-Member -MemberType NoteProperty -Name SysDriveFree -Value ($disk.free / 1MB -as [int])

Write-Output $obj


}

Get-ServerInfo | Format-Table -AutoSize

Here is what we did:

  • We have simplifying the WMI queries.
  • After querying the information, we create a new PSObject and put  it in a variable.
  • To add information to that object, we pipe the object to Add-Member four times.
  • By using, Write-Output, we are writing the final object into the pipeline.
  • The above code also shows the command we can use to call the function.

The above function is infinitely flexible, because it outputs objects instead of text. Example, all of the below are legitimate ways of using the function.

Get-ServerInfo | Format-Table -AutoSize
Get-ServerInfo -computername vaio | Export-Csv info.csv
Get-ServerInfo -comp localhost | ConvertTo-Html | Out-File info.html


Powershell – InvokeCommand versus ComputerName

As IT Pros, we will be fetching a lot of data from remote computers. But, when we are working in the production environment, we have to pay attention to the load that is exerted by the powershell cmdlets on the machine from which we run the cmdlets.

Choosing the correct cmdlet can make a huge difference in the performance.

To demonstrate this, I am browsing thru 4000 lines of System EventLogs and then selecting only those with the eventId as 1014.

I have two servers. DC and Server1. I am running the commands from Sever1. The reason why I am going thru 4000 entries of EventLog is to have a considerable amount of traffic for the Measure-Command, since the cmdlet has one local system (Server1) and one remote computer (DC).

Now, try running the below cmdlets. If you do not have a set up like this, you may use the Microsoft Virtual Labs

Cmdlet 1:

Measure-Command {Get-EventLog system -ComputerName server1, dc -Newest 4000 | where {$_.EventID -eq 1014}}

Cmdlet 2:

Measure-Command {Invoke-Command -ComputerName dc,server1 -ScriptBlock {Get-EventLog system -Newest 4000 | where {$_.EventID -eq 1014}}}

And below is the result:

bothResults

If you pay attention to the number of seconds it took for each command to run, it is pretty clear that the “Invoke-Command” has a better performance compared to the cmdlet with “-ComputerName“.

This is because, by using the Invoke-Command, the processing is done locally in the remote computers. But, while using cmdlets with “-ComputerName“, all the data is first fetched to the local system (from where the cmdlet was fired) and then the processing is done locally.

We can see a difference of 4 seconds just for two computers (local and remote). But in reality we will be working with hundreds and thousands of servers, so the difference will be exponential.