servicecontroller

Powershell – Truth about default formatting

Have you ever ran a powershell cmdlet and stare at the output, and ever wondered, what makes Powershell display the results in such a way? Is there any hidden configuration that guides the powershell engine to display results in a specific format for one cmdlet and in a different format for another cmdlet??

Read along. This blog will answer your curiosity !


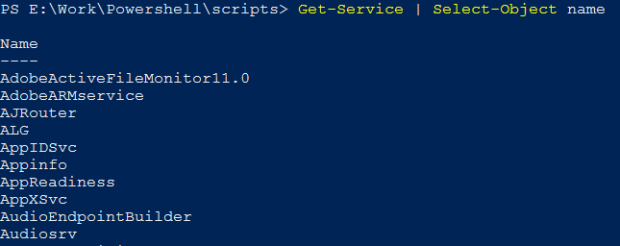
Example: Below is the output of Get-service

get-service


Below is the output of Get-Process

get-process


The answer is Yes. The Powershell Engine is indeed guided by a configuration file that tells powershell on how to display the results. Or we call it as the “Default rules for Formatting” (not an official name :))

You will find the configuration files in the Powershell Installation Folder. Use the “$pshome” variable to find out the Powershell Installation Folder.

PS E:\Work\Powershell\scripts> $pshome
C:\Windows\System32\WindowsPowerShell\v1.0

Change the directory to the Powershell Installation directory and you must be able to find a file named “DotNetTypes.format.ps1xml”.

pshome

Please be cautious, not to edit the file. As it will break the signature and the PowerShell will not be able to use it anymore.

If you want to find out the default rules that are applied, then simply open the file and search for the cmdlet.

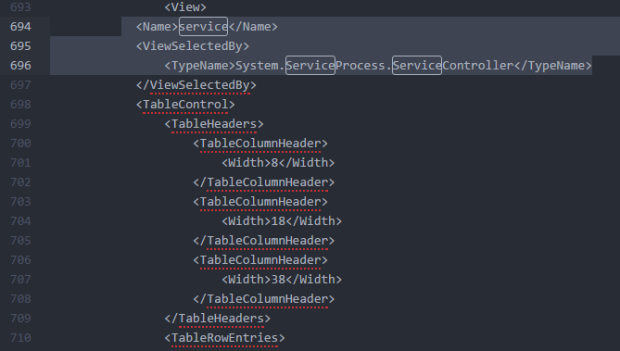
Example: If I want to know the default rules for the “Get-Service” cmdlet, I search the file for the keyword “service”. Note that the keyword “Service” should be enclosed within the “Name” tags. That is the correct one. As per the below image.

dotnettypes


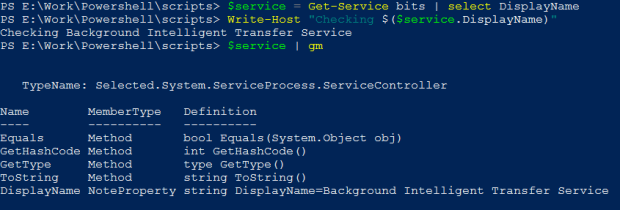
You can double confirm if it is the correct branch, using the “<TypeName>” tag. This value should equate to the TypeName when you do a Get-Member of that cmdlet.

Example: “System.ServiceProcess.ServiceController” for Get-Service

Now what you are looking in the file are set of directions that the Powershell Engine follows. If you can see in the preceding lines, we can see a <TableControl> tag, which says, that the output should be in the form of table. Next few lines specifies the attributes of the table, such as Width and Height.


When you run Get-Service, here’s what happens:

  1. The cmdlet places objects of the type System.ServiceProcess.ServiceController into the pipeline.
  2. At the end of the pipeline is an invisible cmdlet called Out-Default. It is always there, and it’s job is to pick up what ever objects are in the pipeline after all the commands have run.
  3. Out-Default passes the objects to Out-Host, because the PowerShell console is designed to use the screen (called the host) as it’s default form of output.
  4. Most of the Out- cmdlets are incapable of working with normal objects. Instead, they are designed to work with special formatting instructions. So when Out-Host sees that it has been handed normal objects, it passes them to the formatting system.
  5. The formatting system looks at the type of the object and follow an internal set of formatting rules. It uses those rules to produce formatting instructions, which are passed back to Out-Host.
  6. Once Out-Host sees that it has formatting instructions, it follows those instructions  to construct the onscreen display.

So when you run the below cmdlet,

 Get-Process | Out-File process.txt

The out-File will see the normal objects. It will pass them to the formatting system, which will create formatting instructions and then passes back them to the Out-File. The Out-File then constructs the file based on those formatting instructions.

Below are the formatting rules:

  • First Rule: The System looks to see if the type of object it is dealing with has a predefined view. That is what you saw in the DotNetTypes.format.ps1xml.  There are other .format.ps1xml files installed with Powershell, and they are loaded when the powershell starts. You can create your own predefined views as well.


  • Second Rule: If the system is not able to find a predefined view, then it will look to see if anyone has declared a “default display property set” for that type of object. You can find that in a configuration file called- “Types.ps1xml” (under the Powershell Home directory)


defaultpropertyset

Go back to Powershell and Run:

Get-WmiObject win32_operatingsystem

get-wmiobject

I guess, now you know from where these entries came from. The properties you see are present because they are listed as defaults in the Types.ps1xml. If the formatting system finds a “default display property set”, it will use those set of properties.


  • Third Rule: It is about what kind of output to create. If the formatting system will display four or fewer properties, it will use a table. If there are five or more properties, then it will display the results as a list. This is why the Win32_OperatingSystem object was not displayed as a table, as it contained six properties, triggering a list. The theory is that more than 4 properties might not fit into a table, without truncating information.
Advertisement

Powershell – Understanding Select-Object

Understanding how “Select-Object” works, can differentiate an average from a good Powershell user. So lets dedicate some time in understanding how Select-Object works.

Select-Object is mainly used to override the default display of the cmdlets. Example:

select

When you run the Get-Service cmdlet, the output displays the Status, Name and DisplayName. By piping the output of Get-Service to Select-Object, you can override the default display for that object type.

(Piping the Get-Service output to Get-Member, allows you to understand what other properties can be used with the Select-Object)

Select-Object changes the object type

Notice the below two examples and observe the TypeName in both the case.

Get-Service | gm

get-service

Get-Service | Select-Object name | gm

get-service-select

From the above two outputs, you can clearly see that the Select-Object is changing the object from System.ServiceProcess.ServiceController to Selected.System.ServiceProcess.ServiceController. That, it is “Selecting” only few properties from the “original” service object. Now, you will not be able to treat the new object as a service object. Hence you cannot run the operations that you were running on the good-old service object. Hence, the Select-Object HAS to be the last cmdlet in the pipeline.

Selecting subset of objects

Select-Object allows us to choose a subset of objects either from the beginning, from the end, or a chunk of object from a random range. Powershell provides, “First”, “Last” and “Skip” parameters just for these operations.

We are running the below three cmdlets as a demonstration:

Get-Service | Sort-Object name | Select-Object -first 5

Get-Service | Sort-Object name | Select-Object -last 5

Get-Service | Sort-Object name | Select-Object -first 3 -Skip 2

subset

Note: No matter in which order you are specifying the parameters to the Select-Object. If you have specified -Skip, it will ALWAYS execute first, and then -First or -Last (if you have specified along with skip).

Select-Object allows Custom Properties

Custom Properties are the ones which do not come pre-loaded with Powershell. instead they are dynamically created by the user on the go.

Example:

Get-Process | select name, id, @{label='TotalMemory';expression={($_.pm + $_.vm)/ 1MB -as [int]}}

custom properties

What did we just do?

  • We wanted to calculate the TotalMemory of a service. Since we do not have a default parameter that provides us this value. We decided to create a custom property of our own.
  • The structure starting with ‘@‘ sign is called a hash table. A Hash Table contains entries in the form of a name-value pair. Custom Properties comes with two pairs. Each pair is separated by a semi-colon.
  • The first key is called as “Label” or “Name“. The value for this key is what you want to appear in the column header of your custom property.
  • The second key is called the “Expression“. The value for this key,  is the code for the powershell to run/execute to create the resulting row in the custom property.
  • The $_ holder is a place holder for the current object in the pipeline. This can be replaced by $PSItem, both have same meaning.
  • Each @ structure represents a single custom property. You can have as many custom property as you like.

Expanding Properties

Imagine a situation, you want to grab process from the computers [dc=company, dc=pri] in your Active Directory.

You are sure that the below command will fetch the desired computers from the Active Directory.

Get-AdComputer -Filter * -SearchBase "dc=company, dc=pri"

And you also know that the Get-Process has a -ComputerName as a parameter. So you go ahead an happily run the below command:

Get-Process -ComputerName (Get-AdComputer -Filter * -SearchBase "dc=company, dc=pri")

To your surprise the command does not generate the desired result. This is because the Get-AdComputer is generating ADComputer objects. However, the -ComputerName parameter in the Get-Process cmdlet is asking for String[] type input. This is where the -ExpandProperty parameter of the Select-Object shines.

Have a look at this command:

Get-Process -ComputerName (Get-AdComputer -Filter * -SearchBase "dc=company, dc=pri" | Select-Object -ExpandProperty Name)

When Powershell executes this command, it is fetching the desired computers and then expanding the Name property. This has an effect of writing a collection of string to the pipeline, instead of bunch of objects.

-ExpandProperty is a handy technique when you want to save property value to variable.

bits1

As shown above, the Select-Object wrote a ServiceController object into the variable. Hence we need to use a sub-expression to fetch the display name.

bits2

In this case, the Select-Object wrote a String into the variable. This way, it is very easy to access the display name. You can expand single property or a bunch or properties.

From Powershell v3, we have a shortcut way to implicitly expand a property:

(Get-Process).name

implicit

Confirming that the output were String objects:

(Get-Process).name | gm

implicit 2

Some properties are collection of other objects. Example:

expanding1

We can use the -ExpandProperty to “expand” them into their stand-alone objects.

expanding2

We can also use the shortcut trick to get the same results.

expanding3