Today we are looking into PowerShell in Azure Cloud Shell. This is still in public preview as of this writing.
If you are wondering why Microsoft would introduce a PowerShell console inside the Azure Cloud Shell, then have a look at the below features:
Features
Browser-based shell experience
Cloud Shell enables access to a browser-based command-line experience built with Azure management tasks in mind. Leverage Cloud Shell to work untethered from a local machine in a way only the cloud can provide.
Choice of preferred shell experience
Azure Cloud Shell gives you the flexibility of choosing the shell experience that best suits the way you work. Linux users can opt for a Bash experience, while Windows users can opt for PowerShell.
Pre-configured Azure workstation
Cloud Shell comes pre-installed with popular command-line tools and language support so you can work faster.
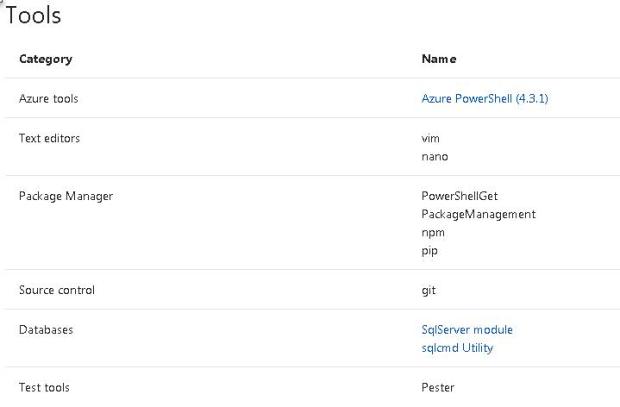
View the full tooling list for Bash experience and PowerShell experience.
Automatic authentication
Cloud Shell securely authenticates automatically on each session for instant access to your resources through the Azure CLI 2.0.
Connect your Azure File storage
Cloud Shell machines are temporary and as a result, require an Azure file share to be mounted as clouddrive to persist your $Home directory. On the first launch, Cloud Shell prompts to create a resource group, storage account, and file share on your behalf. This is a one-time step and will be automatically attached for all sessions. A single file share can be mapped and will be used by both Bash and PowerShell in Cloud Shell.
Below are some conditions that we have to remember:
Cloud Shell runs on a temporary machine provided on a per-session, per-user basis
Cloud Shell times out after 20 minutes without interactive activity
Cloud Shell can only be accessed with a file share attached
Cloud Shell uses the same file share for both Bash and PowerShell
Cloud Shell is assigned one machine per user account
Permissions are set as a regular Linux user (Bash)
Now that we have some background knowledge on the PowerShell in Cloud Shell, let us dig more into the usage of it:
To access the Cloud Shell, click on the PowerShell icon in the Azure portal:

Once you click on the icon, a pane is opened at the bottom of the screen as shown below. You can choose from two options – BASH or PowerShell. Since we are interested in learning PowerShell in CloudShell, let us choose PowerShell as our desired option.

When you are starting for the first time, the Shell will configure an Azure File Storage. Cloud Shell machines are temporary and as a result, require an Azure file share to be mounted as clouddrive to persist your $Home directory. Alternatively, if you have multiple subscriptions, you will be allowed to choose your favorite subscription to work with.

Azure Authentication, Resource Group, Storage Account and File Storage are automatically created as shown below:

Testing an Azure command. Works perfectly.

If you are idle for more than 20 minutes, you will be kicked off the session, and you will have to start the session again:

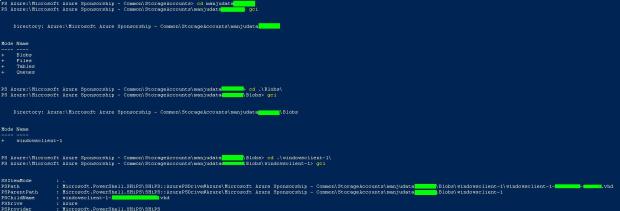
Discovering the drives under PowerShell in Cloud Shell:
Now let us execute the Get-ChildItem cmdlet and see what we can find.

As we can see, running the Get-ChildItem in the current scope will list out the subscriptions that your account is associated with.
Traversing one step deeper into the directory, we can see the resources related to the subscription.

Let us get into the “StroageAccounts” directory to confirm if we get to see a list of Storage Accounts under the selected subscription:
PowerShell cmdlets to manage PowerShell in Cloud Shell:
From the below information, we can see that Microsoft provides us two cmdlets to work with the cloud shell.

Get-CloudDrive provides the details of the “Azure File Share” that was created when the cloud shell started. You may continue to use the cloud share. However, if you want a new one, you can dismount and create a new one using the Dismount-CloudDrive cmdlet.

Note: Once you dismount the Azure file share, your current session will be restarted to set up a new cloud share.
Assumption:
I am assuming that Microsoft is using container service infrastructure to provide a session. You will get the below windows path when you query for the temp drive:
C:\Users\ContainerAdministrator\AppData\Local\Temp

Note the administrator is a “ContainerAdministrator.” The container here could be a Windows Server or a Windows Container. I am assuming it is a Windows Container since the underlying “image” comes pre-packaged with below tools and a temporary one. A typical use case scenario for Container technology.
If the content is valuable to you, do consider sharing it with your friends and colleagues.
Did I miss out anything? Let me know in the comments section.
Download my PowerShell scripts for Free!

One comment