A Point-To-Site(P2S) configuration lets you create a secure connection from an individual client computer to a virtual network. A P2S connection is useful when you want to connect to your VNET from a remote location, such as from home or a conference, or when you only have few clients that need to connect to virtual network.
P2S connections do not require a VPN device or a public-facing IP address to work. A VPN connection is established by starting the connection from client computer.
Below are the operating systems that we can use with Point-To-Site:
- Windows 7 (32-bit and 64-bit)
-
Windows Server 2008 R2 (64-bit only)
-
Windows 8 (32-bit and 64-bit)
-
Windows 8.1 (32-bit and 64-bit)
-
Windows Server 2012 (64-bit only)
-
Windows Server 2012 R2 (64-bit only)
-
Windows 10
This blog walks you through creating a Vnet with Point-To-Site connection in the Resource Manager deployment model using the Azure Portal.
This is a 9 step process:
PART 1 – Create Resource Group
PART 2 – Create Virtual Network
PART 3 – Create Virtual Network Gateway
PART 4 – Generate Certificates
PART 5 – Add The Client Address Pool
PART 6 – Upload the Root certificate .cer file
PART 7 – Download and install the VPN client configuration package
PART 8 – Connect To Azure
PART 9 – Verify your connection
Below are the values that we will use to configure the Point-To-Site connection:
-
Name: VNet1
-
Address space: 192.168.0.0/16
For this example, we use only one address space. You can have more than one address space for your VNet. -
Subnet name: FrontEnd
-
Subnet address range: 192.168.1.0/24
-
Subscription: If you have more than one subscription, verify that you are using the correct one.
-
Resource Group: TestRG
-
Location: East US
-
GatewaySubnet: 192.168.200.0/24
-
Virtual network gateway name: VNet1GW
-
Gateway type: VPN
-
VPN type: Route-based
-
Public IP address: VNet1GWpip
-
Connection type: Point-to-site
-
Client address pool: 172.16.201.0/24
VPN clients that connect to the VNet using this Point-to-Site connection receive an IP address from the client address pool.
PART 1 – Create Resource Group
Click on “Resource Groups” from the side pane >> Click on “ADD” >> Fill in the details >> Click on “CREATE”

PART 2 – Create Virtual Network
-
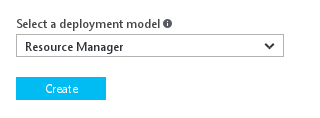
Click on “New” >> Search for “Virtual Network” >> Click on “Virtual Network” from the results.

-
Select “Resource Manager” in the drop down >> Click on “Create”
-
Fill in the details as below.
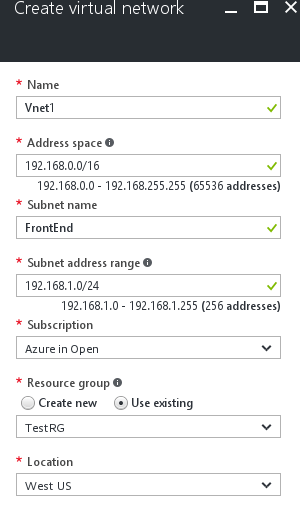
Name: Name of your Virtual Network.
Address Space: Address Space of your Virtual Network.
Subnet Name: Name of the default subnet (You can add more subnets later)
Subnet Address Range: The range of the subnet.
Subscription: If you have multiple subscriptions, you can select them from drop down list.
Resource Group: Select the Resource Group that you just created “TestRG”
Location: Select the location for your VNet. The location determines where the resources that you deploy to this VNet will reside.
Add Additional Address Space (Optional)
Click on the Vnet >> under “Settings” click on “Address Space” >> Add the address space that you want to include >> Click on “Save”

Add Additional Subnets (Optional)

Create A Gateway Subnet
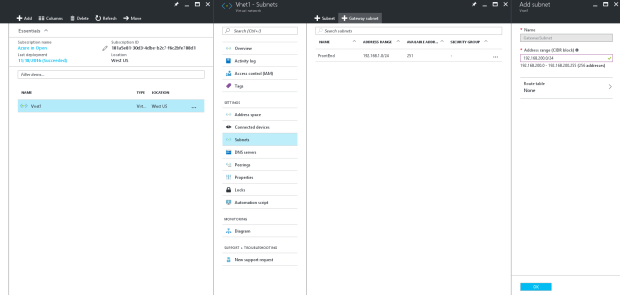
Before connecting your virtual network to gateway, we need to first create the gateway subnet for the virtual network to which you want to connect.
-
Navigate to the virtual network to which you want to connect the gateway. “Vnet1” in our case.
-
Select the Vnet “Vnet1” >> Under the “Settings” >> select “Subnets” >> In the next pane, click on “+Gateway Subnet” >>
-
The Name for your subnet will be automatically filled with the value “GatewaySubnet”. This value is required in order for the Azure to recognize the subnet as Gateway Subnet. Fill in the address range that matches your configuration.
GatewaySubnet: 192.168.200.0/24 (In our case)
-
Click “OK” to create the Gateway Subnet.
Specify A DNS Server (Optional)
You can either choose the Azure-DNS (default one) or your own custom DNS for the name resolution.
-
Click the Virtual Network “Vnet1” >> Under the “Settings” >> Click on “DNS Server”
-
You can see that we have two options, Select “Custom” if you have your own DNS server.
But we will go ahead with the default one for our set-up

PART 3 – Create Virtual Network Gateway
Point-To-Site connection require the following settings:
-
Gateway Type: VPN
-
VPN Type: Route-Based
-
In the Azure portal >> Click on “+” (New) >> Search for “Virtual Network Gateway” from the market place >> Select the “Virtual Network Gateway” from the list. >> Click on “Create” Button.

-
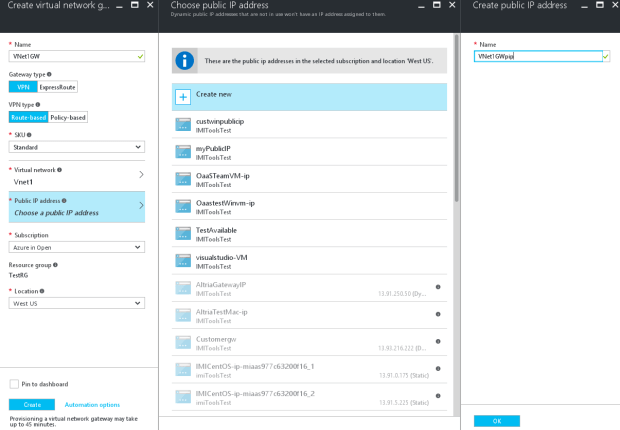
Provide the Virtual Gateway Name. VNet1GW in our case.

Name: Virtual Gateway name (Vnet1GW)
Gateway Type: VPN
VPN Type: Route-Based
SKU: Standard
Virtual Network: The Vnet to which this Gateway has to be attached,
Public IP Address: Public IP to the Virtual Gateway. This will be dynamically assigned.
Subscription: Select the correct subscription.
Resource Group: Select the correct resource group. (TestRG in our case)
Location: Adjust the location, where your Vnet is located.
-
Connect this Virtual Gateway to our Virtual Network.

-
Associate a public IP address to the Virtual Gateway
Click on the “Public IP Address” >> Click on “Create New” >> Provide a name for your Public IP. >> Click on “OK”
-
The settings will be validated. Creating a gateway can take upto 45 minutes. You may have to refresh the portal to see the complete status.
-
After the gateway has been created, you can view the IP assigned to it by looking at the virtual network in the portal. The gateway will appear as a connected device.

PART 4 – Generate Certificates
Certificates are used by Azure to authenticate VPN clients for Point-To-Site VPNs. You export the public certificate data (not the private key) as a Base-64 encoded X.509.cer file from either a root certificate generated by an enterprise certificate solution, or a self signed root certificate. You then import the public certificate data from the root certificate to Azure. Additionally, you need to generate a client certificate from the root certificate for clients. Each client that wants to connect to the virtual network using a P2S connection must have a client certificate installed that was generated from the root certificate.
Create a self-signed certificate
-
Install the Windows Software Development Kit
Windows 10 → https://developer.microsoft.com/en-us/windows/downloads/windows-10-sdk
Windows 7 → https://www.microsoft.com/en-in/download/details.aspx?id=8279 (.NET 4)
https://www.microsoft.com/en-in/download/details.aspx?id=3138 → (.NET 3.5 SP1)
-
After installation, you can find the makecert.exe utility under the path:
C:\Program Files (x86)\Windows Kits\10\bin\x64 - Create and install a certificate in the Personal certificate store on your computer. The following example creates a corresponding .cer file that you upload to Azure when configuring P2S. Run the following command, as administrator. Replace ARMP2SRootCert and ARMP2SRootCert.cer with the name that you want to use for the certificate.
makecert -sky exchange -r -n "CN=ARMP2SRootCert" -pe -a sha1 -len 2048 -ss My "ARMP2SRootCert.cer"
The certificate will be located in your certificates – Current User\Personal\Certificates.
I am using Windows 7, so the “makecert.exe” is stored in → C:\Program Files\Microsoft SDKs\Windows\v7.0\Bin
Command:
cd ‘C:\Program Files\Microsoft SDKs\Windows\v7.0\Bin’
PS C:\Program Files\Microsoft SDKs\Windows\v7.0\Bin> .\makecert.exe -sky exchange -r -n “CN=P2SRootCert” -pe -a sha1 -len 2048 -ss My “P2SRootCert.cer”
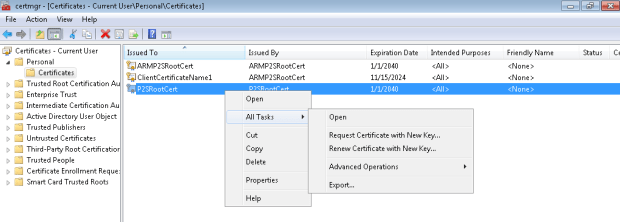
Open “Run” and enter certmgr.msc, this will open the Certificate Manager Tool, If you can browse into the “Personal” >> “Certificates”, you can see your self-signed certificate.
Obtain the Public Key
As part of the VPN Gateway configuration for Point-To-Site connections, the public key for the root certificate is uploaded to Azure.
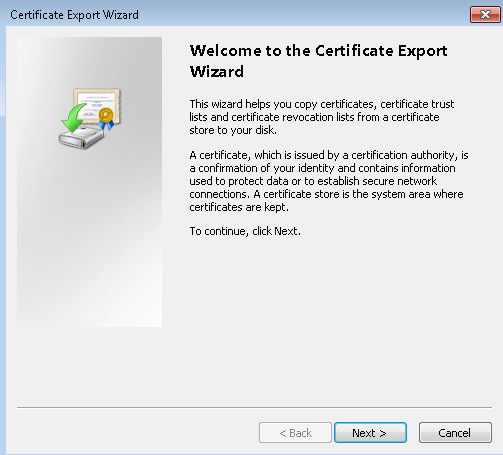
- To obtain the .cer file from the certificate, open certmgr.msc. Right click the self-signed root certificate, click “all tasks”, and then click export. This opens the Certificate Export Wizard.

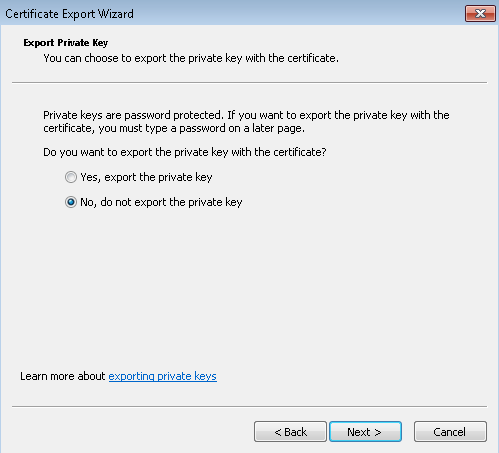
- In the Wizard, click Next, select No, do not export the private key, and then click Next.
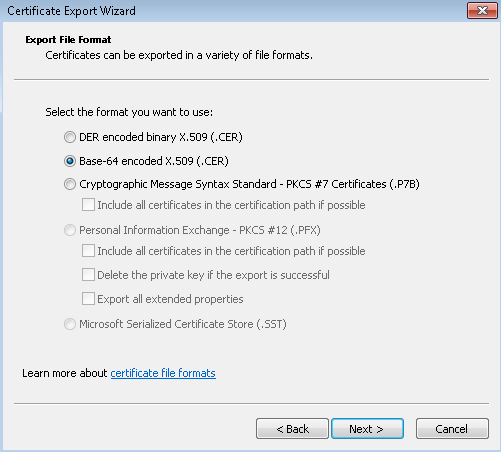
- On the Export File Format page, select Base-64 encoded X.509 (.CER). Then, click Next.
- On the File to Export, Browse to the location to which you want to export the certificate. For File name, name the certificate file. Then click Next.

- Click Finish to export the certificate.
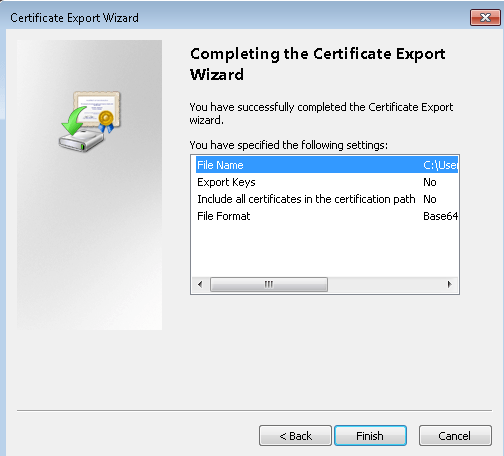
You can see that the certificate file is now exported to the destination folder.

Create and install client certificates
Part A – Generate a client certificate from a self-signed certificate
The following steps walk you through one way to generate a client certificate from a self-signed certificate. You may generate multiple client certificates from the same certificate. Each client certificate can then be exported and installed on the client computer.
1. On the same computer that you used to create the self signed certificate, open Powershell / Command prompt as administrator.
2. In this example, “ARMP2SRootCert” refers to the self-signed certificate that you generated.
- Change “ARMP2SRootCert” to the name of the self-signed root that you are generating the client certificate from.
- Change ClientCertificateName to the name you want to generate a client certificate to be.
Modify and run the sample to generate a client certificate. If you run the following example without modifying it, the result is a client certificate named ClientCertificateName in your Personal certificate store that was generated from root certificate ARMP2SRootCert.
Sample:
makecert.exe -n “CN=ClientCertificateName” -pe -sky exchange -m 96 -ss My -in “ARMP2SRootCert” -is my -a sha1
Our Command:
makecert.exe -n “CN=myClientCertificate” -pe -sky exchange -m 96 -ss My -in “P2SRootCert” -is my -a sha1

3. All certificates are stored in your ‘Certificates – Current User\Personal\Certificates’ store on your computer. You can generate as many client certificates as needed based on this procedure.
Part B – Export a Client Certificate
- To export a client certificate, open certmgr.msc. Right-click the client certificate that you want to export, click all tasks, and then click export. This opens the Certificate Export Wizard.
- In the Wizard, click Next, then select Yes, export the private key, and then click Next.

- On the Export File Format page, you can leave the defaults selected. Then click Next.

- On the Security page, you must protect the private key. If you select to use a password, make sure to record or remember the password that you set for this certificate. Then click Next.

- On the File to Export, Browse to the location to which you want to export the certificate. For File name, name the certificate file. Then click Next.

- Click Finish to export the certificate.

Part C – Install a client certificate
Each client that you want to connect to your virtual network by using a Point-to-Site connection must have a client certificate installed. This certificate is in addition to the required VPN configuration package. The following steps walk you through installing the client certificate manually.
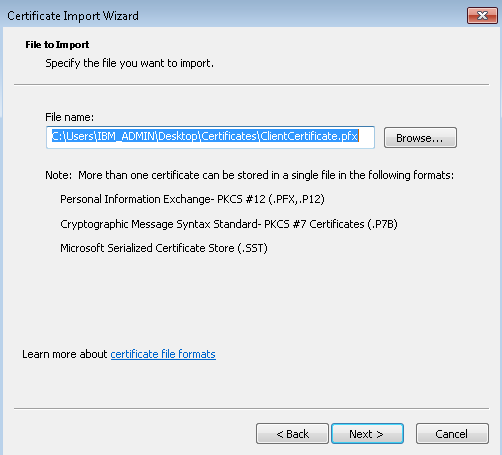
- Locate and copy the .pfx file to the client computer. On the client computer, double-click the .pfx file to install. Leave the Store Location as Current User, then click Next.

- On the File to import page, don’t make any changes. Click Next.
- On the Private key protection page, input the password for the certificate if you used one, or verify that the security principal that is installing the certificate is correct, then click Next.

- On the Certificate Store page, leave the default location, and then click Next.

- Click Finish. On the Security Warning for the certificate installation, click Yes. The certificate is now successfully imported.

PART 5 – Add The Client Address Pool
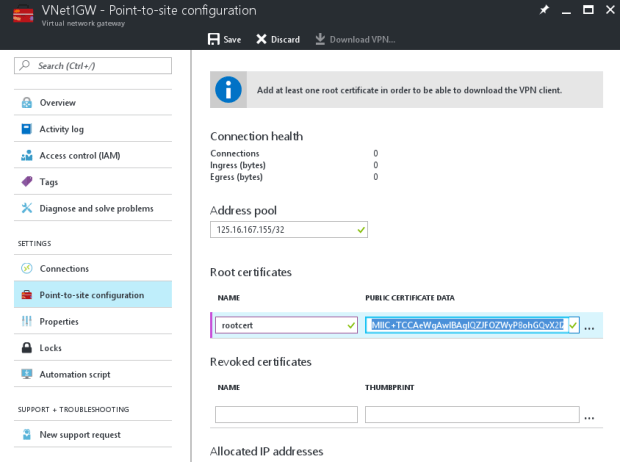
1. Once the virtual network gateway has been created, navigate to the Settings section of the virtual network gateway blade. In the Settings section, click Point-to-site configuration to open the Configuration blade.
2. Address pool is the pool of IP addresses from which clients that connect will receive an IP address. Add the address pool, and then click Save.
Here I am using 125.16.167.155/32 as my Address Pool, which is the public IP address of my laptop / network

PART 6 – Upload the Root certificate .cer file
After the gateway has been created, you can upload the .cer file for a trusted root certificate to Azure. You can upload files for up to 20 root certificates. You do not upload the private key for the root certificate to Azure. Once the .cer file is uploaded, Azure uses it to authenticate clients that connect to the virtual network.
- Navigate to the Point-to-site configuration blade. You will add the .cer files in the Root certificate section of this blade.
- Make sure that you exported the root certificate as a Base-64 encoded X.509 (.cer) file. You need to export it in this format so that you can open the certificate with text editor.
(Best way to do this is to create a copy of the root certificate to a temp location and change the file type to .txt, so you can easily open the file with notepad)
- Open the certificate with a text editor, such as Notepad. Copy only the following section:

- Paste the certificate data into the Public Certificate Data section of the portal. Put the name of the certificate in the Name space, and then click Save. You can add up to 20 trusted root certificates.
PART 7 – Download and install the VPN client configuration package
Clients connecting to Azure using P2S must have both a client certificate, and a VPN client configuration package installed. VPN client configuration packages are available for Windows clients.
The VPN client package contains information to configure the VPN client software that is built into Windows. The configuration is specific to the VPN that you want to connect to. The package does not install additional software.
- On the Point-to-site configuration blade, click Download VPN client to open the Download VPN client blade.
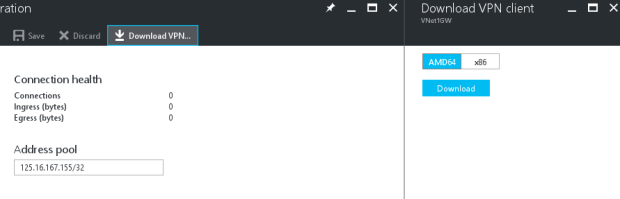
- Select the correct package for your client, then click Download. For 64-bit clients, select AMD64. For 32-bit clients, select x86.
- Install the package on the client computer. If you get a SmartScreen popup, click More info, then Run anyway in order to install the package.
Click on Close, if any antivirus pops-up. Then click on Yes, to continue the installation of VPN Client.

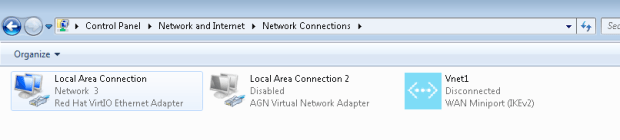
- On the client computer, navigate to Network Settings and click VPN. You will see the connection listed. It will show the name of the virtual network that it will connect to and looks similar to this example:
PART 8 – Connect To Azure
- To connect to your VNet, on the client computer, navigate to VPN connections and locate the VPN connection that you created. It is named the same name as your virtual network. Click Connect. A pop-up message may appear that refers to using the certificate. If this happens, click Continue to use elevated privileges.

- On the Connection status page, click Connect to start the connection. If you see a Select Certificate screen, verify that the client certificate showing is the one that you want to use to connect. If it is not, use the drop-down arrow to select the correct certificate, and then click OK.
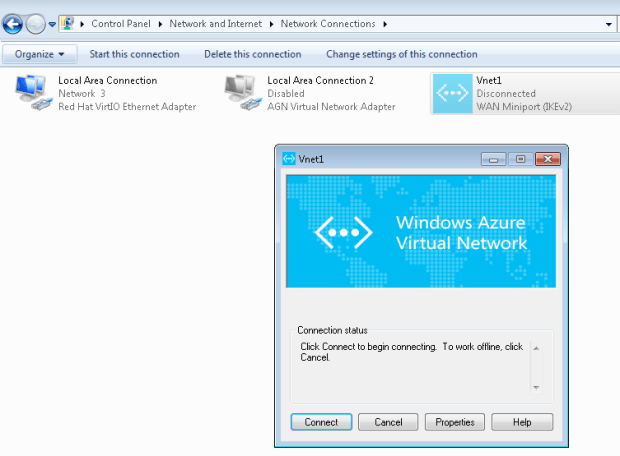


- Your connection should now be established.

PART 9 – Verify your connection
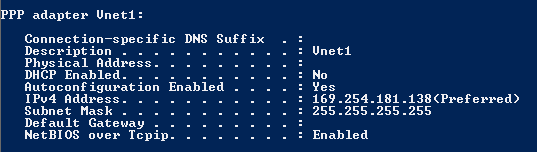
- To verify that your VPN connection is active, open an elevated command prompt, and run ipconfig/all.
- View the results. Notice that the IP address you received is one of the addresses within the Point-to-Site VPN Client Address Pool that you specified in your configuration. The results should be something similar to this:

Reblogged this on Cloud & Virtualization and commented:
Awesome
LikeLike